Monday, April 24, 2017

DIY Pinwheel Mobile

The nursery is coming together and it's time to put on the finishing touches.  I decided that I could make the mobiles to hang above the cribs.  This would save us some money and be something handmade I could do for my babies.  

Before I decided on what kind of mobile to make, I did a little research.  To be honest, I wasn't really sure if mobiles even had a purpose beyond looking cute.  It turns out, they actually can serve a function.  Not only do they give babies something to look at, but they help visually stimulate them.  When babies are born, they can only recognize black and white colors, along with shapes.

So I decided to whip up some cute black and white pinwheels to hang above the babies' cribs.  The black and white color scheme will help their eyesight develop and the fact that they are pinwheels will hopefully invite some movement.  

The first thing I did was gather my supplies.  You don't need a whole lot of materials.  Here's what you need: 

  
-embroidery hoop (I just used the inner circle of a 9" one.)
-6 inch squares of scrapbook paper (You can find two sided scrapbook paper or just glue two squares back to back, like I did.  I ended up using 6 squares per mobile, 12 total.)
-brads (I ended up using 12.)
-clear string or fishing line
-scissors
-hole punch

The first thing you'll want to do is make your pinwheels.  You want to cut from each corner of the square towards the center, but don't cut all the way.  You want to leave the center of the square in tact.  


Use a hole punch to punch a circle in one of the corners of each of the triangle shapes you just made. Since my brads were smaller, I used a small hole punch.  You could use a regular size hole punch, too. Just make sure you buy bigger brads.


You also need to punch a hole in the center of your square.  I just used the point of my scissors to make a tiny hole.  


From there, fold the corner with a hole towards the center of the square. 


Once all the corners line up with the center hole, place a brad in the hole and flip up the ends of the brad to secure it.  


Once all your pinwheels are made, you can start tying them to your embroidery hoop.  I decided to put six on each hoop.  I just tied one end of the string around the ends of the brad and the other end to the hoop. I opted to use clear string so the pinwheels would be the only thing visible.  You could definitely use ribbon or yarn if you want the strings to stand out.  You can choose to make all your pinwheels the same distance from the hoop or you can vary the distances.  I decided to vary the distances.  

Then you will want to tie some string on the top of the hoop in order to hang it up.  After a little trial and error, I ended up tying 3 pieces to the hoop.  I tied each end of the string, so there were 6 connections in the end.  I followed the pattern on the little diagram below, putting a pinwheel in between each of the connection knots to help balance everything out.  


I'm going to get Adam's help to hang them up since I probably shouldn't be climbing up on ladders at this moment.  We're going to use a hook that is screwed directly into the ceiling.  Even though the mobiles are super lightweight, we didn't want them to fall down on the babies, so we are opting for hanging hardware that attaches directly into the wood ceiling.  But I wrapped it around the ceiling fan pulls so you can get an idea of what it will look like all hung up.    


(How do you like that little sneak peak of the nursery?  Aren't the walls gorgeous?!  The full reveal will be coming soon.  Also, I promise I won't keep the blanket hanging on the back of the crib when the babies are in there.  I just stuck it there in the meantime.)


We plan to hang it up high enough that it wouldn't be in the way when we are putting the babies in and out of the cribs, but still low enough that the babies will be able to see it.  As the babies get older and start pulling themselves up in their cribs, we might have to raise the mobiles so they can't grab onto it.  

  
This was a very simple, inexpensive project!  It would be super easy for you to recreate it if you are in the market for a mobile.  I could also see this being a cute decoration for a party or even a fun addition to an older kid's room that they could make themselves.  Happy crafting!   

Sunday, April 23, 2017

I'm Not Very Happy With My Cervix At The Moment

I will warn you right now, I'm going to reveal details about my cervix that not everyone may wish to read about.  So there, you've been warned!

This all came about two weeks ago when I visited my maternal fetal medicine specialist.  Part of the appointment was doing a detailed scan of the babies and taking all kinds of measurements.  The other part of the appointment was doing a vaginal ultrasound to measure my cervix.  

I'll start with the good news:  the babies look fantastic!  They each measured 11 ounces, which is exactly how much they should measure at this point in the pregnancy.  They both had good, strong heartbeats.  They are both moving around.  All of their other measurements were within the normal limits.  Basically, they looked pretty darn perfect.  

Now for the not so good news: the vaginal ultrasound revealed that my cervix is starting to shorten.  This is not what you want to happen at this point in the pregnancy.  The fact that my cervix is shortening now means I could go into preterm labor.  It doesn't mean that I definitely will, but it means that I could.   

Needless to say, this freaked Adam and I out a bit.  My doctor said we aren't looking at numbers that are super scary yet and there were a few things that could be done to hopefully stop my cervix from shortening more.  One of the things was to start taking progesterone, which is taken vaginally.  So I got a prescription filled and started that right away.  

Since my doctor didn't have a baseline measurement, we all agreed to have me come back the following week and see how things were going before moving onto other options.  So the following week I returned and after looking over the ultrasound results, my doctor said some of the measurements were looking better, but some looked slightly worse.  He reccommended putting a pessary around my cervix.  When he was describing what a pessary was, he said it was a ring that he would put around my cervix.  The idea is that the pessary will hold the cervix tightly closed.  And the more weight and pressure that is put on it, the tighter it would cinch up around my cervix.  He did let me know that it's not FDA approved, but is widely used in England.  He said there are mixed results about the effectiveness of it in twin pregnancies, but that it certainly wouldn't harm me or the babies.  So I decided to go ahead with it.  

So he put it in that day.  (This part might also be more information than you want to know about me, so read on with caution.)  I asked it if would hurt during or after and he said it wouldn't feel much different than a pap smear and that I might have some cramping afterwards.  I am a big ninny, so I started to get a bit nervous about the whole ordeal.  

My doctor pulled out the pessary and handed it to the nurse so she could take it out of the plastic wrap.  She pulled out this giant blue thing and I assumed that it was some sort of packaging that the pessary came in.  But, no.  That giant blue thing was the pessary!  From his description, I had envisioned a tiny ring.  But this thing was the size of a very thick donut!  Yikes!  

So he put it in me and it wasn't as terrible as I expected.  I would say it was more uncomfortable than a pap smear, but not exactly painful.  Just unpleasant.  After it was in there, I surprisingly couldn't feel it at all.  

So I am now walking around with a giant blue donut inside of me, in case anyone would care to know.  I have high hopes that it will do its job, along with the progesterone.  I go back this coming week to see how things with my cervix are going.  

Needless to say, it's been a bit of a damper on my pregnancy.  Adam and I tend to worry about things, given our last pregnancy experience.  But we are both trying to be really hopeful and focus on the positive parts of the pregnancy.  

For example, I am now 21 weeks along!  That is more than halfway through the pregnancy.  


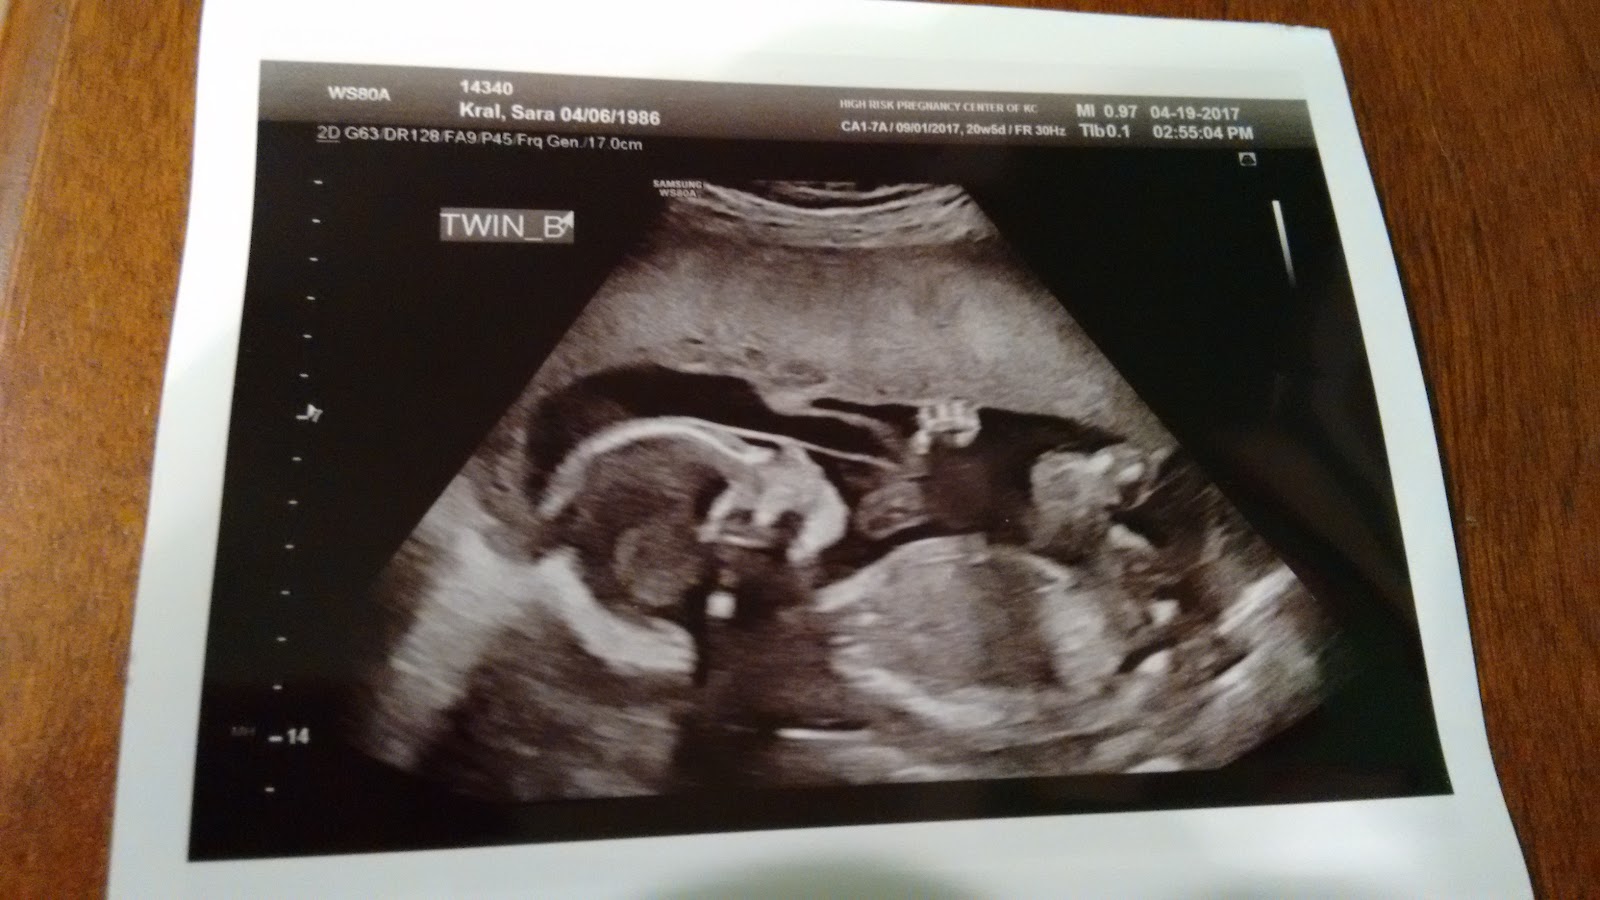
And our babies are healthy and adorable.  Here's a shot of the two of them together.  


Here's our little girl.


And here's our little boy. 


I'm still holding out hope that my cervix makes it to 38 weeks!  As Adam reminded me, it's pretty darn miraculous that we are pregnant with twins in the first place.  Why not hold out for a 38 week miracle?   
    

Thursday, April 13, 2017

School Year Reflections

As I wrap up my second year as a middle school reading teacher, it's a bittersweet time for me.  I have absolutely loved getting to work with my students over the past year and some of my students have been with me for two years now!  They've continued to teach me how to be a better teacher (I shared some of the lessons they've taught me in this post) and I hope I've been able to help them become better readers. Next year I will be embarking on a new profession: Stay At Home Mom.  While I'm heartbroken about leaving my school "kids,"  I am over the moon about the fact that I will get to stay home with my babies.  

Before I focus all my attention on being a mom, I thought I would reflect on some things I've learned this school year in the hopes that it might help out some of my fellow teachers.   

Be Their Person. 

Since I work with my middle school students in a one-on-one setting, I have the luxury of giving them all my time and attention while they are with me.  That means I get to know them really, really well.  The more I get to know my students, the more comfortable they feel around me and the more they open up to me.  I have found that I have become many of my students' "person."  When they do really well on a social studies test, they come tell me about it.  When their brother gets cancer and has to have his leg amputated, they share it with me.  When they have a problem with another teacher, they talk to me about it.  When they don't understand the directions for an assignment, they come ask me for help.  I feel honored to be their "person."  

I know it's hard to be each kids' "person" when you have a classroom full of 25 elementary students or you are a middle school teacher who sees 100 kids a day.  But finding a minute here or there to check in with the kids who really need a "person"  is something that can and should be done.  If I ever go back to being a classroom teacher, you better believe that I will find the time to give each of my students some individual time and attention.  They will give you so much more effort and respect if you do.     

Show Them Their Reading Data.

I feel like there is this big stigma when it comes to showing kids their reading performance scores.  I understand not wanting to embarrass kids or make them feel defeated, but I think it's important for them to know where they are performing.  Part of my job requires me to be evaluated by my administrators.  If they come into my room to evaluate me, I want to know how they thought I did.  I think kids are no different.  

I've found that kids often don't realize just how low they are performing.  And sometimes it's simply because they aren't trying their best.  I do try to focus on how much growth they are making.  I like to show kids their scores from the beginning of the year and then compare it to where they are now.  It can be either a wake up call to try their best on future tests, or it can serve as proof that they are making progress.  


However, it's important how you share the reading data and the conversations that happen around that data.  You have to take the time to explain what it all means and give them an opportunity to ask questions and share their thoughts about it.  Doing so helps empower kids and gives them more control over their performance.  

Just Shut Up.

I know this sounds kind of rude, but it's so true!  When I ask kids to try something or respond to a question I ask of them, it's really easy to jump in and rescue them if they struggle with it.  But what is that really doing for them?  It's teaching them that if they don't respond, someone will do it for them.  I see this learned helplessness so often.  As teachers, we need to give students the opportunities to think critically and solve problems on their own.  Giving them the chance to wrestle with productive struggle will help them grow and push them to do more thinking on their own.  That's our job.  We want students to leave us feeling confident in themselves and have the skills needed to think for themselves.  

So sometimes, as teachers, we need to just shut up.  We have to be okay with those silences and we have to be okay with repeating our questions.  I'm not going to lie, that was hard for me to do at first.  But now that my kids realize I am not going to give them the answer when they don't know it, they rarely sit there and stare at me like they used to.  They try to answer my questions, even if they aren't entirely sure their answers are correct.  A lot of the time, they end up surprising me.  All students really are capable of some pretty incredible insights if we just give them the opportunity to share.  

Use Fun Pens. 

I am big on annotations.  I want my students to not just read, but I want them to think about what they are reading.  Having my students annotate while they read is one way of encouraging them to think as they read.  I teach my students to write down their thoughts, questions, opinions and connections as they read.  
Believe it or not, but the single easiest way to get them to write more is to let them use fun pens.  This seems ridiculous and unimportant, but I'm telling you.  They will write away if they get to use fun pens.  


When In Doubt, Throw In Some Treats. 

One of my biggest goals as a reading teacher is to get my students to enjoy reading.  This involves getting books that my students will actually enjoy into their hands.  This year I tried out a book tasting with the help of my school's librarian.  (Thanks, Karen!)  We worked together to gather books that we love and thought our kids would love.  From there, we set up a book tasting, much like you would a wine tasting.  


The kids loved it!  We set up tables with different book genres.  From there, students had the opportunity to "taste" the books to see if they looked interesting.  We also gave them some treats to taste along with the books, which always ups the interest level in whichever activity is going on.  The students rotated to the different tables and were pretty full of books by the end of the tasting.  It was a hit!


Let Them Know You Think About Them Over The Summer. 

At the end of the year last year, I gave each kiddo a note with some personalized book recommendations. Whether or not they actually tried out the recommendations, they understood that I knew enough about them to pick books they might like.  And that says a lot to a kid.  It tells them that I value them.  

I also sent each kiddo a postcard over the summer.  It was just a simple little note that reinforced the idea that I value them.  I plan to do the same this summer.  


I hope some of these ideas can help out my fellow teachers!  I hope the end of the school year goes well and hope my fellow teachers have a wonderful summer!