Showing posts with label DIY Crafts. Show all posts

Tuesday, May 28, 2024

Dealing With Kid Paper Clutter

Despite schools adopting more technology and digital instruction, there was still quite the avalanche of papers that came home daily with my kindergartners this school year.  As someone who doesn't like a lot of clutter, I made it my mission to stay on top of all the school papers this year.  I wanted to get some systems and routines in place that I can stick to throughout the rest of their school careers.  Having those routines and systems in place will cut down on some of the daily decision-making that can overwhelm me.

The first thing I have my kids do when they come home is to hang up their backpacks.  Adam added this set of hooks before the kids started preschool and they are still just as pretty and functional as the day he installed them.  After I get the kids settled with a snack, I go through their backpacks.  As they get older, they can do this step themselves.  But as kindergartners, I just do this for them.  I immediately put their lunch trays in the dishwasher and their lunch bags in the cabinet.  Then I take care of allllll the papers.  Lyla neatly placed all her papers in her folder each day, whereas Archer just wadded up his papers and shoved them in his bag.


From there, I put the papers in one of four places.  For papers that I needed to reference at a later date (like class newsletters, flyers about upcoming school events, or papers with login information) I clipped on the side of the refrigerator.  I just got two heavy duty metal magnetic clips and wrote each kid's name on one in Sharpie.  This way, I always knew where to find the important papers.  


Any schoolwork or artwork, I clipped onto our metal clothesline that lives in our kitchen.  I put this up when the kids were just babies and kept ripping their artwork off of the fridge.  It continues to be a great way to showcase all their creativity.  Since we can see it from our kitchen table, it serves as great talking points during dinner.  Adam and I can ask about their pieces and it helps jog the kids' memories about what they did in school each day.   


The other two places I put their daily papers in is the trash can or the recycle bin.  Sometimes we wound up with other kids' work or flyers that didn't really apply to us.  So those items immediately went into the recycle bin (paper, cardboard) or trash (things with stickers,tape or glitter can't be recycled.)

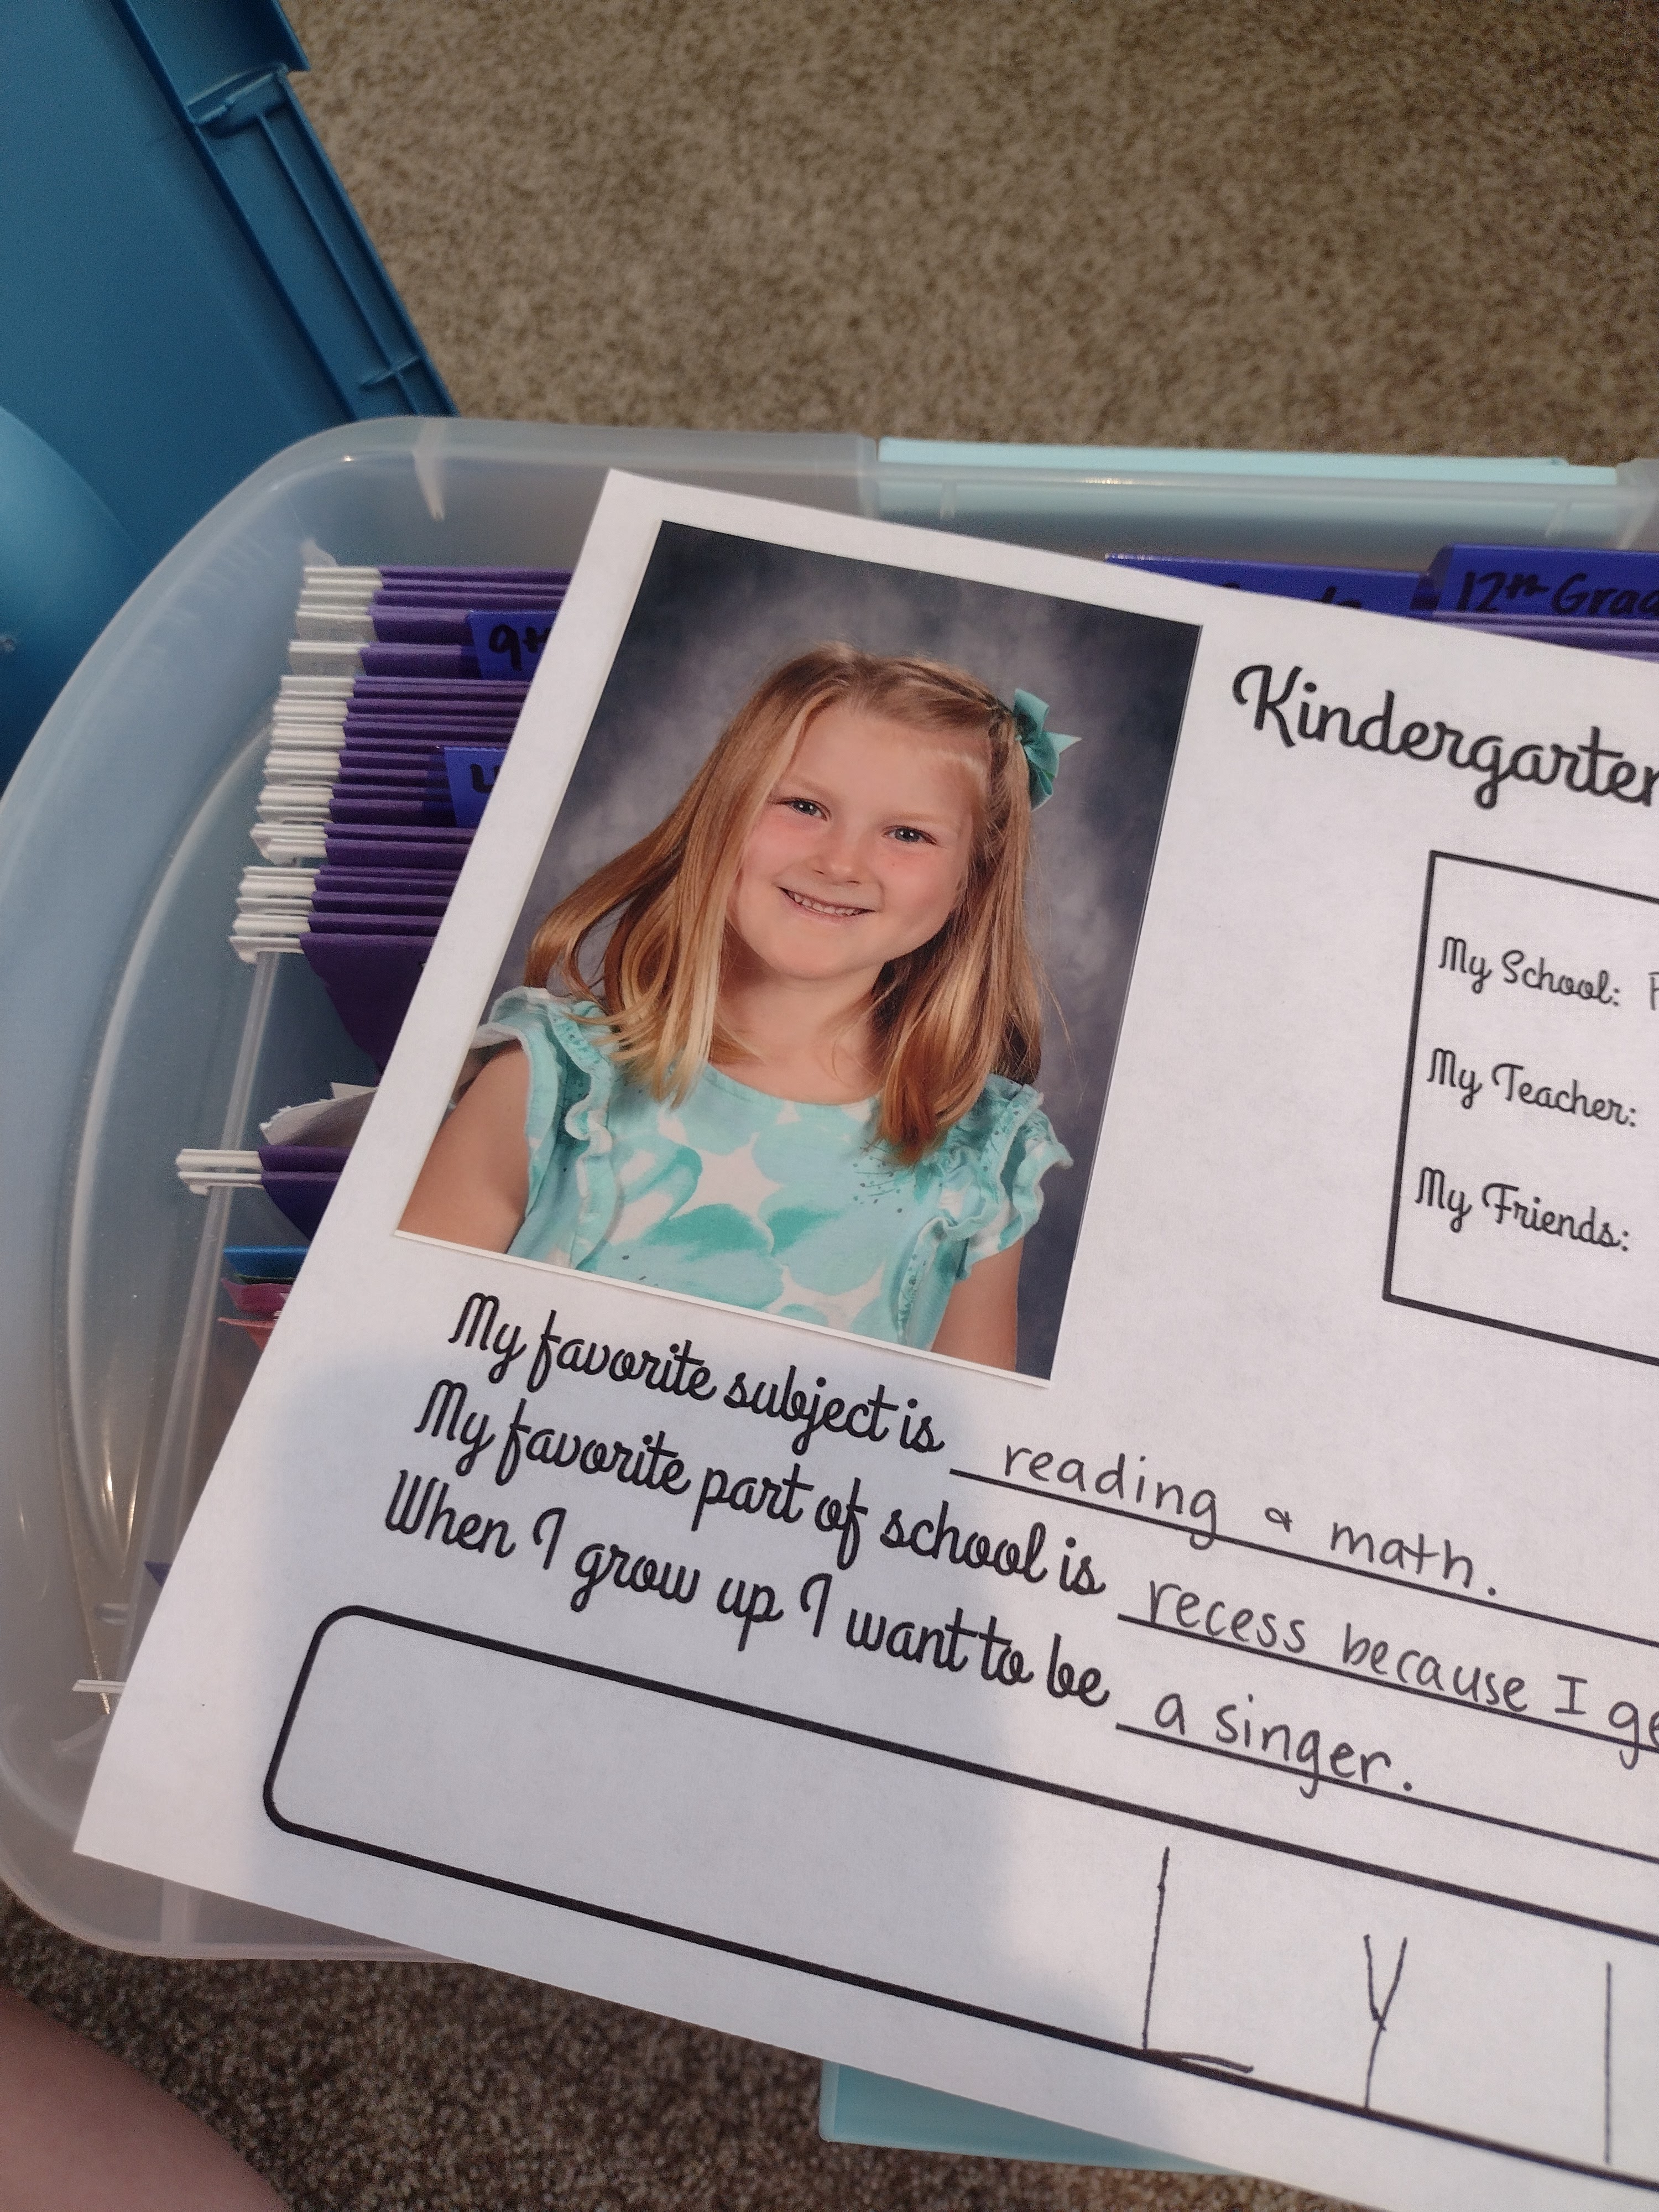
Eventually, our clothesline would get pretty full so I would pull everything down and sort through it.  I kept only the most precious items and threw away or recycled the rest.  Those few precious items went into a file box I keep in each of the kids' closets.  I put a file folder for each grade to keep just a few items for me to look through in the future and for the kids to have when they are older if they want them.  My mom asked me awhile back if I wanted several boxes of schoolwork of mine she saved and I just didn't.  I am not a sentimental person and just didn't want more stuff.  So keeping a small file box per kid seems manageable for me.  As I added more items to the file box, I would often get rid of items I had previously saved.  There is probably about 7-10 pieces I saved per kid from their kindergarten career.  One other thing I did was make up a sheet for each kid where I could include their picture and record their school, teacher, friends, favorite subject, favorite part of school, what job they want when they grow up and a place for their signature.  


Those simple steps really helped to combat all the school clutter this year.  It worked well, so I plan to continue when they move into first grade in the fall.  I'm sure this summer they will be creating far more artwork.  To manage all the artwork they create here at home, we have two places for them to keep their creations.  They each have an "art box" in their closet which is just a plastic lidded bin.  If it gets full, they have to go though it to make space for new creations. 


They also each have some wood strips with clips that Adam whipped up for them in their rooms.  They can display anything they want on here.  If definitely helps the kids to have some physical boundaries for places they can put their creations.  I'm sure as they get older and want to add posters to their walls, we'll revisit what we're doing now.  But as kids who can easily end up with twenty pages of artwork each day, this helps us to keep from drowning in paper.  And at this stage, their artwork is more about the process than the finished product.  I certainly encourage their creativity and provide lots of opportunities to make lots of different types of artwork.  


Hopefully these ideas can help out others who might be drowning in stacks of paper on their kitchen counters.  Best of luck to you in this never-ending battle against paper clutter!  

Wednesday, May 19, 2021

Not Bad For A Pair Of Old Jeans

It's always a sad day when your favorite pair of jeans decide to give up on you.  I'm someone who finds a pair of jeans that I like and then I wear them every day until they start to fall apart.  When my latest pair of jeans decided to rip, I was about ready to find somewhere to recycle them.  But then I stopped and asked myself if I could use them for something else.  


I briefly looked at Pinterest for some inspiration and saw lots of clever ideas out there.  One idea that caught my eye was a tool belt.  Archer would love a tool belt!  I just cut around the waistband and back pockets.  The original waistband was obviously too big, so I trimmed off the excess and just cut a new button hole.  I didn't worry about finishing off the edges or anything.  


It was a hit with Archer!  He was so excited and couldn't get his tools in there fast enough.  He's worn it all morning and wouldn't take it off for rest time.  Not bad for a pair of old jeans!  


Of course I couldn't leave Lyla out.  I decided she would adore a purse, so I got to work piecing together the rest of my old jeans.  I didn't follow a tutorial or pattern; I just kept sewing random things together.  I used the denim from the legs to make the bulk of the purse and sewed on the little coin pocket to the front.  I braided some long strips together to make the handles.  Then I used some scraps of denim to make some cute flowers using this technique.      


While it's far from perfect and a little wonky, Lyla was delighted by it!  She told me it would be the perfect way to carry her night night (the blanket she sleeps with) so it wouldn't drag on the ground.  


Finally, I wanted to find something to do with all the leftover seams.  This idea caught my eye and I thought it would be perfect to use as a hot pad for hot pots and pans on the counter.  I only ended up with enough seams to make a coaster, but it still turned out pretty cute!  


Creating some new items for my kids was the perfect use of this rainy day!  And it was the perfect use of a pair of old jeans!  I really do enjoy doing crafts and putting my creativity to the test.  Doing these projects reminded me I need to make more time to do stuff like this.  It's important for Archer and Lyla to not only see me doing things I love, but to also model how to use our old items in new ways.   


I was also able to find another pair of my beloved jeans on Poshmark!  Poshmark is an online marketplace for secondhand items.  I found another pair of my exact jeans that had only been worn once and cost a fraction of what they would if I were to have bought them new!  Not too shabby. 

Sunday, August 23, 2020

Using What I Have

Since I've spent so much time at home lately, I've been looking for ways to make small tweaks to some spaces around our home.  And since I've been trying to reduce the waste we produce and all the stuff we consume, I've been using things I already have to spruce things up.  My latest target was my laundry room. 

The first thing I did was repaint the generic canvas that was hung up to cover the water hook-ups.  At first I was going to try to find some different artwork or order a canvas photograph, but then I decided I could just use what I already have!  I have plenty of acrylic paints leftover from other projects, so I pulled a few colors that went well together.  EttaVee was my inspiration (though what I ended up with is nowhere near her gorgeous artwork!) so I picked some bright happy colors like pink, orange and yellow.  I also pulled in colors that coordinated with the wall color like teal and navy.  I didn't really know what I was doing, so I just squirted globs of paint on the canvas and swirled it around with a paintbrush.  The final project is bright and happy and makes me smile.  Plus, it was free! 

Next, I took down the blinds.  I've decided I just don't care for blinds.  They collect dust and prevent the maximum amount of sunshine from coming in, even when they're open.  So I took those suckers down.  I left the window naked for a few weeks before deciding my next move.  Since the window is crammed in the corner of the room, I decided I needed some sort of window treatment that fit within the window frame.  I considered making a Roman shade, like I did in the kitchen.  But I decided I didn't really need a functioning shade since I wouldn't be opening and closing it each day.  That's when I decided a little valance would do the trick.  

I wanted something that was fun and had a little whimsy.  (I need all the happiness I can get when doing laundry!)  So I started looking for valances online and saw some cute ones with pom poms and tassels.  I almost bought one, but I looked a little closer and realized I had everything I needed to just make one myself.  After a little searching, I found a handy video that showed me how to make tassels.  I decided to go with teal and navy tassels, to pick up some of the colors from my painting. 

Once my tassels were made, I set about making the valance.  I decided to go with simple white.  I ended up using some curtain lining leftover from my Roman shades.  It was pretty sheer, so I doubled up the layers to make it less see-through.  I wanted my final curtain length to be about a foot long, so I added 3 inches to allow for the hanging process.  The width inside my window became the width of the curtain, but I added an inch to allow for a half inch seam allowance on each side.  I folded the two layers in half and sewed the sides shut.  So the bottom ended up being folded and the top was open, like a pillowcase.  I flipped it inside out and ironed out all the wrinkles at this point.  

Now it was time to add the tassels.  I ended up using a large upholstery needle to sew on my tassels.  I needed a larger eye for my embroidery thread to fit through and an upholstery needle did the trick.  I sewed the tassels on the bottom of the curtain (the folded part) and tied the knots to secure them inside the curtain.  And I used the ol' eyeballing it method to decide how far apart to space each tassel.  (Don't tell Adam.)    

Next, I moved onto figuring out how to hang it up, again, using what we already had on hand.  I decided to use a similar method that we used when installing the Roman shades.  I had Adam cut down a 1x2 to the width of the curtain.  I wrapped it in the same white fabric and stapled the fabric on, much like you would wrap a present.  Just use staples instead of tape.  Then I stapled the top of the curtain (the open side) to the top of the board.  I didn't worry about finishing the top of the curtain since it will never be seen sandwiched between the board and the top of the window trim.   


Finally, I held it in place inside the window frame, while Adam screwed it into the top of the window frame from the bottom of the 1x2.  We made sure to pre-drill the holes first so the drill wouldn't bunch up the fabric.    


It turned out adorable!  The curtain helps finish off the window and adds a little fun to the space.  It also helps tie in the painting.  


These scrappy DIY projects are always my favorite.  There really is something to be said about making something yourself.  I tend to enjoy them long after I've finished making them and they bring about a sense of pride.  And isn't that what your home should be all about?  Your home should definitely be a place you're proud to call home and a space you enjoy being in.  

Tuesday, July 9, 2019

DIY Reusable Grocery Bags

I've been using reusable bags for our groceries for years now.  When I remember to get them out of the trunk, that is.  I've been wanting to get some bags that could be washed (hello, leaking chicken!) and would last a long, long time. 

So I hunted down some canvas bags on Amazon.  I picked some that had a bottom gusset, which means they expand a bit on the bottom and were machine washable.  The main reason I wanted to get new bags was so I wouldn't be putting produce in the same bag I used for chicken last time.  I also wanted to get some that were heavy duty and just the right size.  I was previously using some that were huge, but I would overload them and the heavy load caused the straps to start to rip.  Luckily, those old bags were 100% recyclable, so I chucked them in my recycle bin as soon as the new ones arrived. 

I didn't want to have to wash my bags every time I used them.  I just wanted the option in case one got dirty.  So that meant I needed to figure out a way to identify which type of groceries to put in each bag.  Enter, the trusty paint pen.  I had this paint pen leftover from a previous project.  You can find paint pens at craft stores or Amazon.  Just make sure you look for one that says "permanent" if you plan to wash them.   


I ended up getting four bags, so I thought about the four categories most of my groceries could fit in.  Produce, Dry Goods, Meat, and Dairy ended up being my categories.  While these don't cover everything, it definitely covers most of my groceries.  I also bring along this freezer bag for frozen groceries.  (I should also mention I shop at Aldi, which means I bag my own groceries.  I wouldn't expect a bagger at another grocery store to adhere to my bag labels.)

Once I had my categories nailed down, I just neatly wrote the categories down on each bag.  I thought about doing some sort of fancy cursive, but decided to stick with a simple font that can be easily read.  Usually I have Archer and Lyla with me, so I need to hustle when it comes time to bag since the snacks are running low by this point in the shopping trip.      


The paint pen claimed to be permanent, so I wanted to wash them once to test the claim.  The bags came out great and are currently stashed in my trunk!  I tried them out the other day and they worked out beautifully!  


There's nothing like making grocery shopping just a little easier and more exciting!  

Saturday, September 8, 2018

An Easy Fall Wreath

It's been a little while since I've had the time to do any crafts, so I thought I would remedy that by making a wreath for our front door.  It took me the time span of a few naps, but overall it went pretty quickly.  I wanted to make a wreath that didn't scream fall, unlike this one that I adore, but like to put out closer to Halloween.  So I decided to use cozy textures to give a subtle nod to the season.

I had a small foam wreath I bought at an estate sale a long time ago, and decided to use it for this project.  I wanted to wrap it in some yarn, which seems very cozy and fall-like to me.  So Lyla, Archer and I ventured out to a craft store to get some yarn.  I picked a dark gray color.  By the time we made it to the check-out counter, it was rather soggy from Lyla chewing on it.  But she also didn't scream once during the trip, so who cares about some soggy yarn?  

Once Lyla and Archer were down for their nap, I started to wrap the yarn around the wreath.  I tied the end of the yarn around a straight pin and stuck in the foam wreath to anchor down the starting point.  Then I just wrapped and wrapped and wrapped the yarn around.  This part took a bit longer than I bargained for, but was able to get it all wrapped up in two naps.  When I got back to the starting point, I simply tied the end of the yarn around the straight pin that held the starting point of the yarn.  (If you to make a wreath of your own and don't want to bother with all the yarn wrapping, you could also just get a grapevine wreath.)   


Next came the fun part!  While we were at the craft store, I also picked up some felt which I would turn into flowers.  I picked out some purples, light pink, goldenrod, cream and teals.  I just held up different felt sheets until I had a group of colors that looked good together.  

Once the wreath was wrapped in yarn, I cut the felt sheets into smaller square-ish shapes.  I didn't measure anything or worry about cutting too neatly.  The more imperfect, the better the flowers turn out.  After I cut out the squares, I rounded off the corners.  Then I cut a each rounded square into a spiral, like the photo below shows.  


After that, I started with the outer part of the spiral and just rolled it up until there was nothing left to roll.  I was left with a pretty flower.  I repeated this process using different sized squares in different colors.  I ended up using 10 flowers on my wreath.  (You can use as many or a few flowers as you want.  I just laid out the flowers on the wreath until I had an arrangement I was happy with.)


When I had all my flowers rolled up, I plugged in my hot glue gun.  I put some hot glue on the bottom of the flower and stuck the end over the hot glue, like so.  


From there I cut out some leaves and hot glued those to the backs of the flowers. 


Once I had a good group of flowers with leaves all glued together, I started to play around with the placement on the wreath.  I ended up using 10 flowers, in 2 clumps of 5.  As soon as I was happy with the arrangement, I hot glued the flowers onto the wreath.  


The final step was to attach some twine to the back so I could hang it up on our front door.   I just tied some twine around another straight pin and stuck it into the back of the wreath.  Then I tied the ends into a little bow.  


I love how it turned out!  All the cozy textures reminds me of fall.  And the flowers seem so welcoming and cheery, which is exactly how I want all my guests to feel when they come to our home.  

Tuesday, August 28, 2018

Archer & Lyla's Jungle-Themed First Birthday Party

When I dreamed about becoming a parent, one of the things I imagined would be truly exciting would be planning my kids' birthday parties.  The thought of creating a day to celebrate my kids just sounded like pure fun.  So I was thrilled to be able to plan Archer and Lyla's first birthday party! 

I can see how some people go completely overboard when it comes to kids' birthday parties.  There are so many cute ideas out there and you can get wrapped up in creating a special day.  But I was able to rationalize that Lyla and Archer won't remember this day.  So while I definitely could have scaled back, I don't think I went too crazy.  

I decided on a jungle theme since Archer and Lyla enjoy animals.  They love to read books featuring animals.  So I set about coming up with a cute invitation, a few decorations, and food ideas.  

The guest list was small and included family and friends who Archer and Lyla knew and were comfortable around.  The day was already going to be a departure from their normal routine, so I didn't want to bombard them with a lot of people they weren't familiar with.  I planned the party to start right after their morning nap and end right before their afternoon nap.  That definitely helped them be at their happiest.  We included lunch, too.  

I whipped up some invitations using Google Drawings and then printed them at home on some cardstock.  It was an inexpensive route and got all the information to our guests.


For the decorations, I used some balloons that my mom and I found on clearance at Party City.  I also got a small hand pump to help blow up all the balloons.  (Shout out to my parents and brother for helping blow up all the balloons!)  They were green and fit the jungle theme.  I hung some big ones on the front porch and then used balloon tape to create a garland in the dining room above the babies' high chairs.   


I made a cute little photo banner that showcased all of Archer and Lyla's monthly photos.  I hung it across the fireplace mantel and it was so fun to see their progression.  It's amazing to see how much they grow from month to month!    

I also cut out the number one and painted it with some craft paint I had laying around.  My intention was to take some pictures of Archer and Lyla with it and begin a yearly photo tradition.  But I forgot.  Oops.  Maybe we'll start that tradition next year.  


We ordered pizza for lunch to make things simple.  I didn't want Adam or I having to prepare anything as guests were arriving, so we opted for the easy route.  I did cut up some fruit and made a cute lion veggie tray ahead of time.  (Shout out to my brother for slicing up all those peppers!)  And I set out some animal crackers, too.  


I ordered some cupcakes topped with cookies from Beautifully Delicious.  They turned out so incredibly cute and tasted delicious!  If any local Kansas City folks need any cute cookies, I highly recommend Katie at Beautifully Delicious!     


I did make a batch of dairy-free (for Lyla), gluten-free (for my uncle) cupcakes too.  They certainly weren't cute, but Lyla didn't seem to mind.  She gobbled up her cupcake in mere seconds!   


Archer enjoyed his cupcake too!  We hadn't given the babies any sugar, aside from a few licks of a popsicle.  So they were all about the sugar!    


I didn't plan any activities, but everyone was content to watch Lyla and Archer and just visit.  It was the perfect first birthday party!  Everyone had fun and we got to spoil Archer and Lyla!  


Wednesday, July 18, 2018

What Kid Doesn't Need A Marble Top Picnic Table?

For the babies' first birthday, Adam and I wanted to get them a kitchen set.  We threw around the idea of DIY-ing one.  But we found a heck of a deal on this KidKraft one that was just too good to pass up.  So we bought it and assembled it.  It's currently hiding in our basement waiting for the kids' birthday.  In addition to a kitchen, we decided the kids needed a table to eat all of their home-cooked meals at.  We again threw around the idea of making one ourselves, but my mom found this Little Tykes picnic table at a garage sale for $2!  That was definitely too good of a deal to pass up!  (Thanks, Grandma!)

While the table was in good shape (there were some crayon marks that my mom used a Mr. Clean Magic Eraser to get rid of), it wasn't exactly cute.  The top was beige, the base was blue, and the seats were red.  Since this picnic table was going to live in Lyla's room, I decided I could make it look cuter with just a little bit of effort and a few supplies.

I decided to spray paint the whole thing and then use some "marble" contact paper to put on the top.  I bought a can of Rust-Oleum Spray Paint and Primer in Satin Granite.  It said on the can that it would work on plastic so I was sold.


The first thing I did was hose down the picnic table.  I wanted to make sure the surface was clean and free of any debris before spray painting.  I let it fully dry in the sun.  My original plan was to take the pieces apart and spray paint them separately, but I couldn't figure out how to get it apart.  There weren't any obvious screws or other hardware.  I tried tugging on some places that looked like connecting points, but they didn't easily come apart and I didn't want to break anything.  Plus, this was nap time and the countdown was on!  So I just decided to spray the whole table while it was fully assembled.  I laid out a flattened cardboard box in the yard and put the picnic table on it, top side down.  I held the can about 12 inches away and sprayed several thin, light coats.  It helps if you keep the can moving the whole time so you don't end up with any runs or globs of paint.  It will look like you missed some areas after a coat or two, but that's okay.  It's better to do more coats than just do one that looks bad.  


I didn't really wait until each coat fully dried before putting on the next one.  Time was not on my side, but it worked out just fine to wait just a few minutes in between coats.  Of course, I ran out of spray paint before the project was completed.  So when Archer and Lyla woke up from their naps, we took a trip to Home Depot to get some more spray paint.  They didn't seem to mind the errand because they got to ride in one of those fun race car carts.  Lyla made sure to show Archer how to correctly turn his steering wheel.  


Once Lyla and Archer were down for their afternoon nap, I went back outside to finish the spray painting.  It worked out well that I was able to get the bottom and sides completed with the first can.  That portion was dry so I just flipped the table over and started spraying the top of the table with the second can of spray paint.  I didn't worry about getting the table top absolutely perfect because I knew I was going to cover it with contact paper.

I let it dry completely for about two days before I moved onto the contact paper step.  I let it dry outside on our deck so it wouldn't be so fumy when I brought it inside.  To do the contact paper, I cut a section of contact paper that was a little bit longer than the length of the table.  I peeled off one edge and lined it up with the edge of the table.  There's actually a little lip on the table and I put the contact paper just inside that lip.  It was helpful to only take off part of the paper backing.  That way it didn't all stick together on me.  I just pulled the backing off and smoothed down the contact paper as I went along.  


Once I had the whole piece stuck on the top of the table, I really smoothed it out.  I started in the center and pushed any air bubbles out towards the sides.  


The next step was trimming away the excess contact paper along the edges.  First I tried using the edge of a pair of scissors, but that didn't give me a very crisp cut.  So I tried a razor blade next and that did the trick.  I just followed along the inside lip of the table.  I didn't push too hard because I didn't want to go through the paint or cut into the surface of the table.  Just some very slight pressure cut through the contact paper.  


Once I made it all the way around the table, I just pulled off the excess contact paper like a giant sticker.  It was very satisfying!  


It turned out super cute!  They gray will look perfect in Lyla's room with her other gray furniture.  And the "marble" gives it a touch a sophistication.  What kid doesn't need that in their toys?! ;)  I also like the fact that the contact paper is removeable, so I can just peel that up and replace it when they scribble all over it or take a few bites out of the edges.  Such a simple project that will really dress up Lyla's room!   

Monday, July 2, 2018

Dada Makes Archer & Lyla Some Toys

Adam has put his love of woodworking into creating some toys for the babies recently.  He made something called a Pikler triangle.  It's a jungle gym of sorts for babies and toddlers to work on their fine and gross motor skills. 


Of course it turned out beautifully.  It's the kind of thing you don't mind being out in your living room because it looks so nice, as opposed to all of the other tacky-colored toys that litter our living room floor on a daily basis.


He made it out of walnut, oak and poplar so there would be a bit of contrast between the different types of wood.  Once it was all assembled, Adam put a coat of shellac over the top of it to protect it from all of the baby drool it will undoubtedly encounter.  Shellac is non-toxic and safe to use on baby toys.  It's a good thing, too, because Archer and Lyla put EVERYTHING in their mouths these days.


There are two sets of rungs that the kids can climb on.  They have both mastered climbing to the top.  But once they make it to the top, look down and realize how far off the ground they are, they holler and want us to help them back down.  There's also a two-sided ramp.  One side has slats on it that they can use as hand and foot holds.  The other side is smooth and can be used like a slide.  Both Archer and Lyla instinctively know to hold up their feet and their heads when they slide down.  It's pretty cute!


When Adam first told me about this, I thought it sounded like something the kids would enjoy.  Now that it's complete and in our living room, I have realized that I might not want them becoming so adept at climbing!  It kinda gives me a heart attack when they scale to the top of it.  And they've started to transfer their climbing skills to other areas.  Just today Archer used my leg as a ladder rung to climb on top of the ottoman.  It's only a matter of time before they scale the bookcase!  


Oh well!  This Pikler triangle certainly brings them joy.  It is fun to watch them develop new skills like seeing their little hands grasp the rungs and their little feet gain their footing.  And Lyla has a new prop to help her perfect her dance moves.   


An equally exciting addition to Lyla and Archer's toy arsenal are some wooden blocks.  Adam cut some blocks from some maple wood.  He sanded them until they were super smooth and made sure to round out all the sharp corners and edges.  After adding a coat of shellac, they were ready to be broken in by Archer and Lyla.  Jazzy wanted in on the fun too, but decided against it when Archer started tossing the blocks around.    


They both love chewing on them which is helping them cut even more teeth.  They like to clang two of them together to make fun sounds.  And they also enjoy knocking over the towers of blocks that Adam builds for them.    


It's so fun to watch what each one decides to do with the blocks.  Archer even tried to stack one block on top of the other.  He couldn't quite get it, which made him mad.  But he'll be stacking up his own towers in no time!  


Another wooden toy that I am going to commission Adam to make when the babies get a bit older are some wooden puzzles.  Adam made the one below for our friends' daughter as a birthday gift.  I think it turned out so cute!  After Adam cut out the pieces, I added a few coats of acrylic paint.  A final topcoat of shellac completed the project.  Adam has some time before he has to begin this project.  I figure we'll wait until the babies can tell us what kind of puzzle they'd like for Dada to make them.  


It's so exciting to see Adam use his talents to make toys for our babies.  I'm sure it's rewarding for him to watch Lyla and Archer play with something he created.  I can only imagine all the fun projects Adam will make for Archer and Lyla!