Thursday, February 23, 2023

The LEGO Invasion

Archer has a newfound love for LEGOs.  And they are quickly taking over my floors.  There's nothing quite like a LEGO being shoved into your foot as you take an innocent walk across your living room.  Those pesky clear pieces blend right in!  And even if you think you are thorough in picking up all the pieces, there's always a rogue one that gets left out and manages to end up right in your walking path.    


The invasion started slowly, but has ramped up rather quickly.  A couple years ago, Adam gave the kids a small box of LEGOs that were from his childhood.  There weren't that many and he picked some of the larger pieces.  It was easy enough to pick up all the pieces and put them away when the kids were finished playing with them.  Since Archer really seemed to get into putting the LEGOs together, he ended up getting a few smaller sets for birthdays and Christmas.  I kept those sets separated into small bags and would let him get out one at a time.  Well, then the sets he got started getting bigger and more complicated and with more pieces.  And the sets would connect to other sets so he didn't want to put one set away before getting out a new one.  But then he'd inevitably take apart the sets and the pieces would get all mixed up and then he'd get upset when he tried to rebuild them but couldn't find all the pieces.  I even spent several hours one weekend painstakingly separating out all the sets and putting them in labeled bags.  But then they somehow got all mixed up again!  

My kids typically play either in the living room or their bedrooms.  We don't have a dedicated playroom, so I rotate out toys in our living room and keep some in their bedrooms.  I started by having Archer keep the LEGOs in his room, but then I'd find him with his light on tinkering with his LEGOs well after he was supposed to have gone to sleep.  So then I moved them down to the living room.  I would let him keep his creations on the fireplace, but have him pick up all the unused pieces off the floor each evening.  But each morning he would dump all those pieces out again.  Many of those tiny pieces would trickle into the hallway and kitchen.  Finally, I got sick of stepping on LEGOs all day long.  I gathered them all up and stuck them all in the family room.  Since that space is a work in progress, it is essentially a large open area.  Archer did like having a larger area to spread everything out and not have to pick up all the pieces each evening.  

But then, as LEGOs tend to do, they started slowing creeping into more areas.  He liked to use the hard flooring by the door to our garage as a base.  But this, being the entrance to our home we use most often, became problematic.  We all got tired of stepping over Archer's creations anytime we wanted to leave the house.  Adam and I tossed some ideas around and we decided to make him a LEGO base/storage unit.       


Adam whipped up a plan to use some of the plywood we had used when our family room floor was being replaced.  He cut up a base that would fit underneath our couch in the family room.  Then he added some wood along the edges to serve as a fence for keeping all of the LEGOs within the unit.  Adam made sure to sand everything smooth and even routed the edges of the fence so it would be safe for little hands.   


We also decided to put a divider inside the unit.  Our thinking was that one section would be the building area and place where he could keep his completed pieces.  The other section could house all the loose, unused pieces.  We ran this idea by Archer and he enthusiastically approved.  Adam also added a handle on the front of the unit to make it easy to pull the unit out from under the couch.  He made it nice and big so it can be easily grabbed and is super sturdy.  


The final step was to paint it all.  Since it wasn't made from the highest quality plywood, Adam decided painting it would result in the smoothest, splinter-free finish.  We showed Archer all the random paint we have in the basement and he settled on a gray, blue and green color scheme.  Before the paint, Adam and Archer put down a coat of primer.  Archer was pretty pumped to participate in this step.  He very enthusiastically slapped on the primer.  Notice that Lyla decided goggles were in order to keep any paint splatters from getting in her eyes.  


Waiting for the paint to dry was quite the challenge for Archer.  The night after he helped Adam put on the final coats of paint, he came down from his room (when he was supposed to be asleep) to check on how it was drying.  The next day he got to try out his new LEGO unit!  He was thrilled to get to add all his pieces to it and start building!  


Archer adores his new LEGO playing station!  The divided sections definitely help give Archer some visual cues about where to keep the creations he's built and also the pieces that aren't being used at the moment.  It's super sturdy, so it's no problem when Archer decides he needs to get up close to one of his builds.  


I adore the fact that there's now a physical boundary for all the LEGO pieces.  I don't find them scattered all around the house like I used to.  We keep the unit out for the most part so Archer can keep his creations up.  But if we need some more floor space or are taking a break from building, it tucks right under the couch.  Hooray for hidden storage! 


The large handle makes it easy for Archer to get it out all by himself.  This has been such a fantastic solution for corralling all those LEGO pieces.  My feet are most appreciative.    

As much as we all love the final product, watching Archer and Adam work together on this project was the true highlight.  Watching Archer chose paint colors and help out allowed him to grow his confidence.  Seeing Adam let go of some of his perfectionism to allow Archer to take the reigns was fun to see too.  Much like all DIY projects, you get just as much out of the process as you do the final product.    

Friday, February 3, 2023

Putting Our Family Room Back Together

I'm happy to report that progress is being made on our family room!  We are slowly, but surely getting it back into a functioning space.  After sharing about our debacle in the last post, we left off with the new concrete floor curing.  While we were waiting for the concrete to cure before working on the flooring, Adam worked on rebuilding the steps up to the kitchen.  The original steps had to be completely removed before the new concrete could be poured.  Unfortunately, they had to be removed in pieces so they weren't able to just be put back as they were.  So Adam had to build new stairs from scratch.  He decided to build two boxes to act as the steps with some help from my dad.  (Thanks, Dad!)    


Once the boxes were in place, he worked on adding some hardwood flooring on top to cover up the unfinished boxes.  Luckily, we had some leftover flooring from when we had the hardwood flooring installed.  It's a good thing we hung onto it!  I'm not one to hang onto a bunch of extra stuff just in case we might need it in the future.  But in this case I'm glad we had it.  Adam also put the handrail back in place, along with the spindles on the stairs.  Once the stairs were back in place, he worked on putting back the laminate flooring in front of the steps.  


While Adam was busy with all that work, I took a weekend to paint.  And paint.  And paint.  Since we had drywall work done in the half bathroom and family room as part of the project, everything needed a new coat of paint.  There were a lot of sections of the wall that had been patched, so I decided to put a coat of primer over all the walls in the half bathroom and family room to prevent any drywall flashing.  Once the primer was dry, I put a fresh coat of paint on the family room walls.  Since it was such a light color, I got away with only needing one coat of paint.  The dark bathroom walls did end up needing two coats.  I also gave the wainscoting and wood trim in the bathroom two coats of fresh paint too.  I was certainly ready to stash away the paintbrushes and take a break from looking at any paint cans after all those coats.   

By this time, it had been over 30 days since we had the concrete poured.  That meant it was cured enough to cover the bathroom floor with tile and the family room floor with carpet.  One of the silver linings of this project was getting to pick out some new tile for the half bathroom.  I decided to go with small white hex tile.  It's a pretty classic tile that will stand the test of time, while also adding a fresh feel to the small bathroom.  I picked a medium tone gray grout, which helps the tile stand out a bit.  It will also help hide dust and dirt a bit better than white grout.  Since we had already put so much work into the space, we decided to hire this job out.  I love how it turned out!  And I love that we didn't have to do it even more.  

After the tile was installed, we had the original plumbing crew come back to install our new toilet and hook up the plumbing for the vanity.  It's been pretty exciting to have another functioning bathroom in our house again!  We didn't realize just how much we utilized that bathroom until it was out of commission for several months.  

The next step was to have the carpet relaid.  We were able to save the carpet that was previously in the family room and just have it put back in.  We did have to get a new carpet pad, but at least we were able to use the old carpet.  Luckily the carpet crew was able to make the old carpet fit nicely within the space.  Having carpet back in the family room really helped the room feel like it was part of our house again.   


With the carpet in place, we could then move back some of the furniture that we had been housing in other parts of our house.  We moved the aquarium stand (currently a work in progress) into the room from our dining room.  That will be the next big project Adam plans to finish.  It's already taking shape nicely and I'm sure our fish are eager to get to move back upstairs from the basement when it's finished.   


Prior to this big ol' project, we had a red couch and love seat in the family room.  We decided to move the love seat downstairs to make more room for the aquarium stand.  And I also decided we should switch the red couch for the tan couch we already had in our basement.  The red furniture never really jived with the rest of the house.  We talked my parents (Thanks Mom and Dad!) into helping us with the couch switcheroo since there were stairs and tricky doors involved.  After seeing the tan couch in the family room, I'm so happy we made the switch!  It just flows so much better with the overall vibe and color scheme of the rest of the house.  


While this room isn't quite finished yet, it's looking so much more put together now!  The walls and floors are back to normal.  Adam even managed to paint the ceiling and add a new ceiling fan.  Now we get to focus on the fun part of decorating the space.  Adam is going to focus on the aquarium stand next.  And I'm going to start mulling over what other furniture and decor we should add.  


This whole project has been such an expensive headache, but we're so happy to be on the other side of it.  And we're trying to focus on the silver linings.  Now we get to make this family room seem like a cohesive part of our home.  I'm looking forward to all the hours our family will get to clock in here together.  

Monday, January 2, 2023

Ah, The Joys of Home Ownership!

As anyone who owns a home knows, it's not always rainbows and sunshine.  There's always something that needs to be fixed or replaced.  Most recently, the sewer line under the concrete slab in our family room needed to be replaced.  Cha-ching! 

We noticed some significant settling going on in our family room last spring.  We thought it was just some random settlement and decided to try to mudjack the floor.  While the mudjacking appeared to have fixed the problem in our family room at first, over time it started to settle again.  We really noticed this when Adam brought in the new aquarium stand he is building into the family room.  He realized the floor was incredibly unlevel and had settled since we had the slab mudjacked back in April.  (You can see in the photo below how much the aquarium stand would have needed to be brought up in order to be level on the floor).  Adam, being an engineer, used all his knowledge and figured out there had to be some sort of water or leaking causing the settlement.  It turns out his guess was correct.  After having a sewer line inspection, we found out the sewer line below the concrete slab in our family room was broken.  It was completely disconnected.  And all the water we were using in the showers, toilets and washing machine was just pouring out of the disconnected pipe.  There was also a section of the pipe that had a belly to it, so instead of water flushing through the pipe, it was just hanging out in the low spot.  To say we were shocked was an understatement.  

While Adam is an engineer, he wanted to get some other perspectives from engineers who specialize in residential engineering to help us figure out what to do.  So he consulted with two different residential engineers to help us figure out the best course of action.  Adam's uncle who has significant knowledge in construction was also able to give us some insight.  After taking everything into consideration, there were two options for fixing the broken pipe.  

One option was to trench around the pipe in the concrete slab, replace the broken section and low bellies of the pipe, then pour back concrete where the trench was.  This was the least invasive and easiest fix.  However, we weren't sure what all that water had done underneath the slab.  The fact that the slab was settling in multiple areas led us to believe it had washed away a lot of the gravel underneath the slab.  So even if we fixed the pipe, there could still be continued settling since we wouldn't be able to backfill all the areas that would need more gravel.    

The other option was to completely demolish the existing concrete slab.  That way we could replace the entire length of the pipe and replenish all the necessary gravel to prevent settling from happening in the future.  It would also give us the opportunity to tie the floor slab into the stem wall foundation, which it was not previously tied into.  

Ultimately, we decided to completely demolish the existing concrete slab.  This, of course, was the most expensive and challenging option.  Luckily, Adam had a solid understanding of everything this project would entail and took on the role of general contractor.  He arranged for three separate crews to tackle three separate jobs.  But before any of the crews could start their work, we had a lot of prep work to do.

Adam did most of this work, though I tried to help out when I wasn't doing all the everyday kid and house stuff.  My dad also was kind enough to help out.  All the furniture had to be stuck somewhere else.  The carpet (that we just had installed in April) had to be removed, along with the carpet pad and carpet tack.  Part of the flooring by the entrance from the garage had to be taken out and the steps that lead up to our kitchen.  The toilet and vanity in the half bathroom had to be taken out, too.  And the vents needed to be sealed off to prevent a bunch of dust from getting into our HVAC system.  Since the concrete slab was going to be removed and a new concrete floor was going to be poured inside our house, we wanted to contain the construction zone as much as possible.  Adam made a temporary wall to block off the family room from the rest of our house.  This definitely helped keep the project zone contained, which was super nice.  Though it meant we could no longer access the garage or basement. 

Once everything that needed to be removed was out, Adam moved onto protecting what was left in the room.  He put up plastic sheeting, polystyrene and pipe insulation around the door frames.  (I'm not gonna lie, using all this plastic and Styrofoam in our home made my sustainability-seeking heart hurt.  But we figured protecting the woodwork and drywall we had would prevent us from having to replace it after the concrete was poured would ultimately be the better option.  Adam was also able to pass along the polystyrene to someone else to use for another project).  Getting everything prepped for the first crew to come in was a job in itself!  

At this point, we were ready for the first crew to come demolish the existing concrete slab.  Adam decided having the concrete cut into sections using a wet saw, as opposed to having it jack hammered out, would be far less dusty and result in far less damage.  We went with a local company that specializes in this sort of work and were very happy with the results.  The kids and I stayed out of the house while this was going on to avoid the noise, while Adam stuck around to manage everything.  As you can see from the photo below, once the floor was cut, it sunk quite a bit in many areas.  This told us there were voids underneath the slab and made us realize we had made the right choice by taking out the whole slab.  Once the sections were cut, the crew removed all the sections.  

We were left with a giant gravel pit.  We weren't sure exactly what to expect once the concrete slab was removed.  There was a chance we would need some sort of remediation since sewage was essentially pouring out of the broken pipe.  But we got lucky in that regard.  We didn't need remediation and there was no smelliness to deal with either.  The second crew stepped in at this point.  They worked on filling in the voids, digging to the broken pipe and putting in some piers to help further stabilize the new concrete slab that would be poured.  Here's the broken pipe.  It's a little tricky to tell from the photo, but there's a giant gap! 
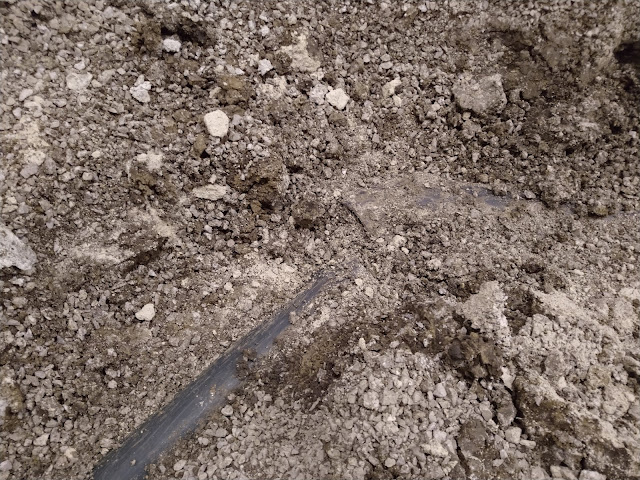
Now that the pipe was unearthed, it was time for the third crew (the plumbers) to step in.  They took out the old sewer line and replaced it with a new PVC one.  This took care of the broken segment and also the belly in the pipe.  They did have to drill a new hole in our basement wall to make the slope of the pipe work correctly.  Obviously the water had to be turned off while this work took place.  The kids had preschool in the morning and then I kept them out and about for the rest of the afternoon, while Adam kept an eye on the progress.    


Once the plumbing was wrapped up, the second crew could come back to get things prepped for the new concrete slab.  They worked on putting in the piers and leveling the grade.  

Next came putting down a vapor barrier to help with moisture and to help keep the family room floor a bit warmer.  Laying the rebar happened after that.  Once the rebar was in place, it was time for the concrete!  

Here's where things got a bit tricky.  Things had been going pretty smoothly and on schedule up until this point.  But the morning the concrete truck was supposed to arrive, things went awry.  The pumper truck arrived and got their hoses hooked up.  Then everyone waited and waited for the concrete truck to get here.  When it finally arrived, it was well beyond when it was expected.  I don't know much about concrete, but apparently you have a time limit from the time it gets mixed in the truck to the time it is poured.  Our time limit had expired and the pumper truck guy didn't want to risk the chance of the concrete drying up in his hoses.  The mix also wasn't the exact mix that Adam had specified.  So we sent the concrete truck back.  This was a real bummer, but we also wanted to make sure everything was done correctly.  With the amount of money we were spending and the time we had invested, we weren't going to take any chances.  So we had to reschedule the pumper truck and the concrete truck for later in the week.  Luckily, things panned out the second time around.  And one silver lining was that Archer and Lyla got to be around to see it all happen since they were at preschool during the first go around.  

The concrete got poured without a hitch.  The crew got it all smoothed out.  And now our floor is pretty darn level!  It's not one hundred percent perfect, but it's close enough.  The fact that we kept the walls by the half bathroom in made it tricky to get the floor completely level.  But taking those walls out would have resulted in even more work and money and time, so we are pleased with how everything panned out given the constraints.  

Now we get to wait for the concrete to cure before we can start putting our family room back together.  Adam and I are both very happy to be on this side of the project.  While it's far from over, we feel like we made it past the most difficult hurdles.  Projects like these aren't for the faint of heart!  While Adam and I tried really hard to keep a positive attitude during all this, we certainly weren't immune to all the stress that came with it.  Adam took on so much to figure out how to solve this problem and then to make it happen.  And despite having sewer line insurance, it wasn't covered by insurance because the pipe was "under the dwelling."  We're thankful we had money saved up for issues like this, but it's never fun to put money into house projects that you won't end up ever seeing.  It's also been a big disruption to our regular routines and having our house in disarray has been hard for a tidy person like myself.  

But we're moving on and looking forward to turning our family room into a space for our family to enjoy together!  We've got tile installation scheduled for our half bathroom and carpet re-installation scheduled for the family room in a few weeks.  Pretty soon we'll be enjoying our new and improved space!