Showing posts with label Home Decor. Show all posts

Thursday, February 23, 2023

The LEGO Invasion

Archer has a newfound love for LEGOs.  And they are quickly taking over my floors.  There's nothing quite like a LEGO being shoved into your foot as you take an innocent walk across your living room.  Those pesky clear pieces blend right in!  And even if you think you are thorough in picking up all the pieces, there's always a rogue one that gets left out and manages to end up right in your walking path.    


The invasion started slowly, but has ramped up rather quickly.  A couple years ago, Adam gave the kids a small box of LEGOs that were from his childhood.  There weren't that many and he picked some of the larger pieces.  It was easy enough to pick up all the pieces and put them away when the kids were finished playing with them.  Since Archer really seemed to get into putting the LEGOs together, he ended up getting a few smaller sets for birthdays and Christmas.  I kept those sets separated into small bags and would let him get out one at a time.  Well, then the sets he got started getting bigger and more complicated and with more pieces.  And the sets would connect to other sets so he didn't want to put one set away before getting out a new one.  But then he'd inevitably take apart the sets and the pieces would get all mixed up and then he'd get upset when he tried to rebuild them but couldn't find all the pieces.  I even spent several hours one weekend painstakingly separating out all the sets and putting them in labeled bags.  But then they somehow got all mixed up again!  

My kids typically play either in the living room or their bedrooms.  We don't have a dedicated playroom, so I rotate out toys in our living room and keep some in their bedrooms.  I started by having Archer keep the LEGOs in his room, but then I'd find him with his light on tinkering with his LEGOs well after he was supposed to have gone to sleep.  So then I moved them down to the living room.  I would let him keep his creations on the fireplace, but have him pick up all the unused pieces off the floor each evening.  But each morning he would dump all those pieces out again.  Many of those tiny pieces would trickle into the hallway and kitchen.  Finally, I got sick of stepping on LEGOs all day long.  I gathered them all up and stuck them all in the family room.  Since that space is a work in progress, it is essentially a large open area.  Archer did like having a larger area to spread everything out and not have to pick up all the pieces each evening.  

But then, as LEGOs tend to do, they started slowing creeping into more areas.  He liked to use the hard flooring by the door to our garage as a base.  But this, being the entrance to our home we use most often, became problematic.  We all got tired of stepping over Archer's creations anytime we wanted to leave the house.  Adam and I tossed some ideas around and we decided to make him a LEGO base/storage unit.       


Adam whipped up a plan to use some of the plywood we had used when our family room floor was being replaced.  He cut up a base that would fit underneath our couch in the family room.  Then he added some wood along the edges to serve as a fence for keeping all of the LEGOs within the unit.  Adam made sure to sand everything smooth and even routed the edges of the fence so it would be safe for little hands.   


We also decided to put a divider inside the unit.  Our thinking was that one section would be the building area and place where he could keep his completed pieces.  The other section could house all the loose, unused pieces.  We ran this idea by Archer and he enthusiastically approved.  Adam also added a handle on the front of the unit to make it easy to pull the unit out from under the couch.  He made it nice and big so it can be easily grabbed and is super sturdy.  


The final step was to paint it all.  Since it wasn't made from the highest quality plywood, Adam decided painting it would result in the smoothest, splinter-free finish.  We showed Archer all the random paint we have in the basement and he settled on a gray, blue and green color scheme.  Before the paint, Adam and Archer put down a coat of primer.  Archer was pretty pumped to participate in this step.  He very enthusiastically slapped on the primer.  Notice that Lyla decided goggles were in order to keep any paint splatters from getting in her eyes.  


Waiting for the paint to dry was quite the challenge for Archer.  The night after he helped Adam put on the final coats of paint, he came down from his room (when he was supposed to be asleep) to check on how it was drying.  The next day he got to try out his new LEGO unit!  He was thrilled to get to add all his pieces to it and start building!  


Archer adores his new LEGO playing station!  The divided sections definitely help give Archer some visual cues about where to keep the creations he's built and also the pieces that aren't being used at the moment.  It's super sturdy, so it's no problem when Archer decides he needs to get up close to one of his builds.  


I adore the fact that there's now a physical boundary for all the LEGO pieces.  I don't find them scattered all around the house like I used to.  We keep the unit out for the most part so Archer can keep his creations up.  But if we need some more floor space or are taking a break from building, it tucks right under the couch.  Hooray for hidden storage! 


The large handle makes it easy for Archer to get it out all by himself.  This has been such a fantastic solution for corralling all those LEGO pieces.  My feet are most appreciative.    

As much as we all love the final product, watching Archer and Adam work together on this project was the true highlight.  Watching Archer chose paint colors and help out allowed him to grow his confidence.  Seeing Adam let go of some of his perfectionism to allow Archer to take the reigns was fun to see too.  Much like all DIY projects, you get just as much out of the process as you do the final product.    

Friday, February 3, 2023

Putting Our Family Room Back Together

I'm happy to report that progress is being made on our family room!  We are slowly, but surely getting it back into a functioning space.  After sharing about our debacle in the last post, we left off with the new concrete floor curing.  While we were waiting for the concrete to cure before working on the flooring, Adam worked on rebuilding the steps up to the kitchen.  The original steps had to be completely removed before the new concrete could be poured.  Unfortunately, they had to be removed in pieces so they weren't able to just be put back as they were.  So Adam had to build new stairs from scratch.  He decided to build two boxes to act as the steps with some help from my dad.  (Thanks, Dad!)    


Once the boxes were in place, he worked on adding some hardwood flooring on top to cover up the unfinished boxes.  Luckily, we had some leftover flooring from when we had the hardwood flooring installed.  It's a good thing we hung onto it!  I'm not one to hang onto a bunch of extra stuff just in case we might need it in the future.  But in this case I'm glad we had it.  Adam also put the handrail back in place, along with the spindles on the stairs.  Once the stairs were back in place, he worked on putting back the laminate flooring in front of the steps.  


While Adam was busy with all that work, I took a weekend to paint.  And paint.  And paint.  Since we had drywall work done in the half bathroom and family room as part of the project, everything needed a new coat of paint.  There were a lot of sections of the wall that had been patched, so I decided to put a coat of primer over all the walls in the half bathroom and family room to prevent any drywall flashing.  Once the primer was dry, I put a fresh coat of paint on the family room walls.  Since it was such a light color, I got away with only needing one coat of paint.  The dark bathroom walls did end up needing two coats.  I also gave the wainscoting and wood trim in the bathroom two coats of fresh paint too.  I was certainly ready to stash away the paintbrushes and take a break from looking at any paint cans after all those coats.   

By this time, it had been over 30 days since we had the concrete poured.  That meant it was cured enough to cover the bathroom floor with tile and the family room floor with carpet.  One of the silver linings of this project was getting to pick out some new tile for the half bathroom.  I decided to go with small white hex tile.  It's a pretty classic tile that will stand the test of time, while also adding a fresh feel to the small bathroom.  I picked a medium tone gray grout, which helps the tile stand out a bit.  It will also help hide dust and dirt a bit better than white grout.  Since we had already put so much work into the space, we decided to hire this job out.  I love how it turned out!  And I love that we didn't have to do it even more.  

After the tile was installed, we had the original plumbing crew come back to install our new toilet and hook up the plumbing for the vanity.  It's been pretty exciting to have another functioning bathroom in our house again!  We didn't realize just how much we utilized that bathroom until it was out of commission for several months.  

The next step was to have the carpet relaid.  We were able to save the carpet that was previously in the family room and just have it put back in.  We did have to get a new carpet pad, but at least we were able to use the old carpet.  Luckily the carpet crew was able to make the old carpet fit nicely within the space.  Having carpet back in the family room really helped the room feel like it was part of our house again.   


With the carpet in place, we could then move back some of the furniture that we had been housing in other parts of our house.  We moved the aquarium stand (currently a work in progress) into the room from our dining room.  That will be the next big project Adam plans to finish.  It's already taking shape nicely and I'm sure our fish are eager to get to move back upstairs from the basement when it's finished.   


Prior to this big ol' project, we had a red couch and love seat in the family room.  We decided to move the love seat downstairs to make more room for the aquarium stand.  And I also decided we should switch the red couch for the tan couch we already had in our basement.  The red furniture never really jived with the rest of the house.  We talked my parents (Thanks Mom and Dad!) into helping us with the couch switcheroo since there were stairs and tricky doors involved.  After seeing the tan couch in the family room, I'm so happy we made the switch!  It just flows so much better with the overall vibe and color scheme of the rest of the house.  


While this room isn't quite finished yet, it's looking so much more put together now!  The walls and floors are back to normal.  Adam even managed to paint the ceiling and add a new ceiling fan.  Now we get to focus on the fun part of decorating the space.  Adam is going to focus on the aquarium stand next.  And I'm going to start mulling over what other furniture and decor we should add.  


This whole project has been such an expensive headache, but we're so happy to be on the other side of it.  And we're trying to focus on the silver linings.  Now we get to make this family room seem like a cohesive part of our home.  I'm looking forward to all the hours our family will get to clock in here together.  

Sunday, August 21, 2022

A Little Preschool Preparation

Somehow my children are old enough to go to preschool!  It is baffling to me because just yesterday they were unable to hold their own heads up.  Now they are ready to go to preschool without me.  I know that I will have a harder time adjusting than they will, so I am throwing myself into getting all the details sorted out.

One little detail I wanted to sort out was creating a place for Archer and Lyla to hang their backpacks.  I am all about every item in our home having a place to live.  You know, a place for everything and everything in its place.  I wanted it to be somewhere visible and somewhere Archer and Lyla can easily access.  That way they can be in charge of keeping track of their backpacks.  


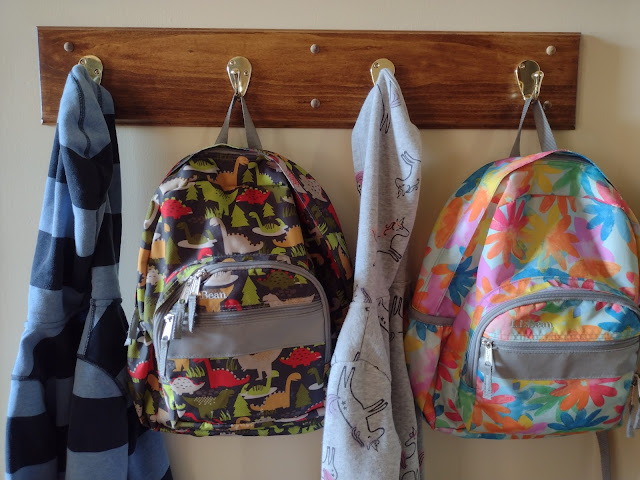
I found the perfect spot for their backpacks right by our front door.  It was practically begging for some hooks!  I threw around the idea of just hanging some hooks directly into the drywall using some drywall anchors.  But my kids tend to be a little rough and I had visions of them tearing the hooks out of the wall the first time they picked up their backpacks.  So I decided a wood board behind the hooks was in order.  That way, the board could be directly screwed into the studs and the hooks could be directly screwed into the board.  


Lucky for me, I knew the perfect guy for the job.  Just look at how excited he is to have one more task added to his already lengthy to do list. 


Adam has lots of scrap wood lying around, so he found a piece of poplar that would do the trick.  I told him I just needed it cut down to size and stained, but he wouldn't stand for just that.  He had to add his woodworking skills to the job and decided to route the edges to give it some more character.  


Once the edges of the board were routed, he stained it using some old stain we already had on hand.  It's the same stain (General Finishes Gel Stain in Nutmeg) we used on our DIY growth ruler that we made several years ago.  Then he finished off the wood with a satin topcoat.  Once the board the was dry, he added the hooks and screwed the board right into the wall.  Two sets of screws went directly into the studs.  The far set of screws just went into the drywall, so Adam made sure to add some drywall anchors into the drywall before securing it to the wall.  To hide the screws, he added some wooden button plugs.  It turned out beautifully!   


The new set of hooks fits in nicely with the rest of our little makeshift command center.  The brass hooks tie in nicely with my thrifted brass mail center.  And I'll be sure to take a "First Day of Preschool" picture with the kids holding our letter board sign.  


We made sure to hang it at the perfect height for our kids.  They can easily hang up and take off their backpacks from the hooks.  I asked Adam to include four hooks so they would also have a place to hang a jacket or coat.  Having these hooks will help us keep track of the items they'll need to take to preschool and also foster some independence for Archer and Lyla.  They'll be in charge of hanging up their backpacks when they get home.  


We've got all the supplies we need and are ready to start preschool!  We even made sure to get their teacher a little something to let her know how much we appreciate her.  Our preschool made it easy for us by including a list of each teacher's favorites on their website.  So Archer and Lyla will be bringing their teacher a Target gift card and Snickers bars when they head to preschool.  They also each made a little card.  Having been a teacher before staying home with Archer and Lyla, I remember how much those small kindnesses are appreciated.  


Now we're all set for the start of preschool!  And I'll try my very best not to cry as I drop them off.  

Tuesday, April 12, 2022

Out With The Old (Carpet), In With The New!

Our home has been undergoing some major interior changes lately!  (As I'm typing this, I'm sitting in my living room in a camp chair while wearing headphones.)  We had to have some noisy, boring foundation work done in our family room.  The family room is on a concrete slab, which was starting to settle.  That meant we needed to rip up the carpet in the family room so the foundation crew could do their thing.  Ripping up the carpet led us to a much more exciting change: getting new carpet!  When we moved into our home 10 years ago (how in the world has it been 10 years?!) we didn't have the funds to replace the carpet throughout our whole house.  So we prioritized replacing only the carpet in the family room that was heavily stained.  The rest of the carpet in the house was in decent condition and a neutral color.  We've done a lot of living on those carpets throughout the past ten years!  

Even though Jazzy was the best dog ever, she did occasionally trot through the house with muddy paws.  Adam and I used to eat dinner on the couch in front of the TV before we had kids and have spilled random food and drinks on the carpet.  Lyla and Archer have done their fair share of making messes.  I can still recall halfheartedly wiping up their spit up from the carpet when they were little babies.  Needless to say, it was time to replace the carpet!  

Now I know some of you may be wondering why we didn't opt to replace the carpet with wood floors.  While I very much like the look of wood floors, I just prefer the coziness of carpet in our living room, family room and bedrooms.  I also prefer vacuuming carpet to vacuuming and mopping hard wood floors.  Plus, the cost fit within our budget better.  

We visited a local flooring store nearby to check out our options.  It turns out there are way too many options out there!  We eventually brought home several samples to test out in our home.  It's always a good idea to get samples of flooring (or paint colors or fabric) and see what it looks like in your own home.  Everyone's home has slightly different lighting and finishes and seeing the sample in the space really does help.  

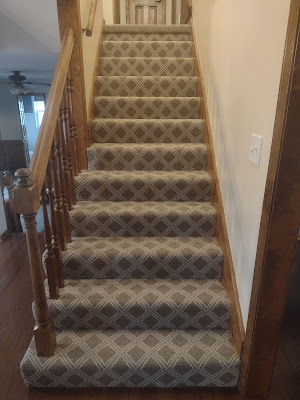
We settled on a nylon plush Shaw carpet (the color is called Dockside View) for the living room, family room, bedrooms and upstairs hallway.  Nylon is supposed to be more durable, not show traffic as much, and have a longer lifespan than polyester.  (Of course that also means it is more expensive.)  We decided to go with nylon, as opposed to a natural fiber like wool, for it's stain-resistant properties.  It's a beige color with some gray undertones.  It's slightly darker than our old carpet, but it somehow manages to compliment our many different paint colors and wood trims throughout our house.  For the stairs, we opted for a nylon Berber patterned carpet.  We wanted something with a lower pile for the stairs and since it was a smaller space, we decided to have some fun with pattern.  


Once we decided on the carpet, getting it installed was quite the challenge!  Adam and I opted to rip out the old carpet to save some money.  Adam also wanted to add more screws to the plywood to help alleviate all the many squeaks our floors made.  That meant we had to tear out the old carpet and pad and remove all the staples that were holding the pad in place.  Adam also wanted to paint some of the ceilings since we would have to move all the furniture and it wouldn't matter if we got paint on the subfloor.  He also wanted to replace the light fixture above the stairs and add some decorative molding.  The light bulb burned out in the original light fixture years ago, but it was way too high to get to in order to replace it.

With all those tasks on our to do list, we decided it would be far simpler to complete if Archer and Lyla were out of the way.  So I brought the kids to my parents' house for an extended visit.  While we were visiting, Adam stayed back to change the light fixture and add the decorative molding.  This was no easy task for him!  In fact, he had to build his own scaffolding in order to get to the light fixture!  Much to the kids' delight, he got the scaffolding up before we left for my parents so they got to play on it.  


After giving Adam a week to complete his stairway masterpiece, I returned without the kids to help rip out all the old carpet.  (Thanks for babysitting, Grandma & Grandpa!)  Due to rain delays, it worked out that the foundation crew and the carpet crew would be starting on the same day.  That meant that we couldn't have any furniture in the family room or the garage or parts of the basement.  (They were also doing foundation work in the garage and basement.)  So Adam and I had to get very creative about where to put all of the furniture from our living room, family room, Archer's room, Lyla's room and guest room/office, while also allowing pathways for the crews.  We had couches and tables piled up all over the place!  It was like a real-life game of Tetris.   


Once all the furniture was moved, Adam focused on ripping up the old carpet and pad.  I helped haul it outside and remove the staples leftover from the old pad, while Adam added close to 2,000 screws!  It's no wonder we had so many squeaky floors.  A lot of the nails were coming up and Adam realized some of the original nails didn't even hit the floor joists.  It's safe to say our subfloors are now securely in place and our floors are far less squeaky.  

Finally, the crews arrived and took care of the foundation work and carpet installation.  It was a hectic couple of days around our house, but well worth the outcome.  The mudjacking we had to have completed in our family room did result in some cracked bathroom tile in our half bathroom, so stayed tuned for our next project.  But the carpet went in without a hitch and it looks so incredibly nice!  I really didn't realize just how stained and worn out our old carpet was getting.  Our new carpet looks and feels so luxurious!  It's a bit hard to see just how much better things look with new carpet, but I'll share some pictures.  

Let's start with our stairway.  Look at our sad, worn out stair carpet and that piddly little light that we had going on.  


Now look at our stairway!  It looks so much grander with the new carpet and decorative molding!  And it's certainly far more illuminated with our new chandelier!


It's amazing how much nicer the carpet feels when you are walking around on it.  I find Archer and Lyla just laying on the floor quite often now.  After we bought the carpet I got a little anxious that the new carpet would be too dark and make our rooms feel gloomy, but I'm happy to report it's the perfect shade!  Our hope is that any messes or spills that will inevitably occur won't stand out quite as much as they did on our old, lighter carpet.  


I took advantage of the kids being away to rearrange and declutter their rooms a bit.  The new furniture layout in both of their rooms gives them a bit more space to play.  They were both so excited about the new carpet and new layout that they haven't even noticed the stuff I decluttered.  (Shhhh....please don't tell them!)


I'm glad I have this photo of Lyla's cutely curated bookshelf because it will never look like this again.  


Now Archer, on the other hand, truly enjoys a nice tidy space.  He is very good about cleaning up and knows exactly where things belong.  I'm glad I passed down my organizing genes to at least one of my children.   


Ahh, another lovely organized bookshelf!  


It's safe to say our whole family is enjoying our new carpet.  


Now onto our next project...replacing bathroom tile! 

Wednesday, May 19, 2021

Not Bad For A Pair Of Old Jeans

It's always a sad day when your favorite pair of jeans decide to give up on you.  I'm someone who finds a pair of jeans that I like and then I wear them every day until they start to fall apart.  When my latest pair of jeans decided to rip, I was about ready to find somewhere to recycle them.  But then I stopped and asked myself if I could use them for something else.  


I briefly looked at Pinterest for some inspiration and saw lots of clever ideas out there.  One idea that caught my eye was a tool belt.  Archer would love a tool belt!  I just cut around the waistband and back pockets.  The original waistband was obviously too big, so I trimmed off the excess and just cut a new button hole.  I didn't worry about finishing off the edges or anything.  


It was a hit with Archer!  He was so excited and couldn't get his tools in there fast enough.  He's worn it all morning and wouldn't take it off for rest time.  Not bad for a pair of old jeans!  


Of course I couldn't leave Lyla out.  I decided she would adore a purse, so I got to work piecing together the rest of my old jeans.  I didn't follow a tutorial or pattern; I just kept sewing random things together.  I used the denim from the legs to make the bulk of the purse and sewed on the little coin pocket to the front.  I braided some long strips together to make the handles.  Then I used some scraps of denim to make some cute flowers using this technique.      


While it's far from perfect and a little wonky, Lyla was delighted by it!  She told me it would be the perfect way to carry her night night (the blanket she sleeps with) so it wouldn't drag on the ground.  


Finally, I wanted to find something to do with all the leftover seams.  This idea caught my eye and I thought it would be perfect to use as a hot pad for hot pots and pans on the counter.  I only ended up with enough seams to make a coaster, but it still turned out pretty cute!  


Creating some new items for my kids was the perfect use of this rainy day!  And it was the perfect use of a pair of old jeans!  I really do enjoy doing crafts and putting my creativity to the test.  Doing these projects reminded me I need to make more time to do stuff like this.  It's important for Archer and Lyla to not only see me doing things I love, but to also model how to use our old items in new ways.   


I was also able to find another pair of my beloved jeans on Poshmark!  Poshmark is an online marketplace for secondhand items.  I found another pair of my exact jeans that had only been worn once and cost a fraction of what they would if I were to have bought them new!  Not too shabby. 

Monday, May 3, 2021

Choosing Secondhand First

In an effort to live more sustainably, I have been trying to choose secondhand items before buying new items.  Giving used items a second life prevents them from ending up in landfills and it saves me money too!  There are an overwhelming number of secondhand options out there.  It's been surprisingly easy to find specific, quality items. 

I also find myself enjoying secondhand items more than new items because they come with a history.  For example, the table Adam recently refinished for our kitchen was from his childhood.  We found out from his dad that it was actually bought in Guam, where his parents were stationed when Adam was born!  How fun is that?!  We also recently bought a Pottery Barn bed for Archer on Facebook Marketplace.  After talking with the sellers, we learned it had been their 15 year old son's childhood bed.  It made me happy to know it would continue on in another little boy's life and I think it made the sellers feel better knowing it would live on as well.

My goal in sharing about my love of buying pre-loved items is to help normalize secondhand shopping.  Secondhand items often get a bad rap.  People tend to assume they somehow have lesser quality and there's a social stigma for using secondhand items.  I grew up going to garage sales with my mom and getting hand-me-downs from my cousin Becky.  I've appreciated those items just as much (often even more!) than new items I've received.  

Here are some of my favorite ways to get excellent-quality secondhand items: 

My Buy Nothing Group 

I recently came across something called The Buy Nothing Project.  The mission of the project states: "We offer people a way to give and receive, share, lend, and express gratitude through a worldwide network of hyper-local gift economies in which the true wealth is the web of connections formed between people who are real-life neighbors."  Basically, you can join a group (the groups are on Facebook at this time, though they are working on a separate app) based on where you live.  Once you've joined a group, you can gift items you no longer need or want or ask for things you do need or want.  It's such a special way to connect with your neighbors.  

I have been able to pass along a lot stuff I wasn't using and give it to people who could actually use it.  I have also greatly benefited from my neighbors' generosity!  I have asked for and received tomato cages for my garden, a mini muffin pan, a shepherd's hook for my hummingbird feeder, dresses, doll clothes, board games and more!  The gratitude piece of the project really makes the group special.  I shared some of Archer's pajamas that he outgrew with someone in our group.  She sent me a picture of her son wearing Archer's outgrown pajamas and it warmed my heart so much!

My enthusiastic participation in the group led me to become one of the group admin.  I highly encourage you to see if there's a group in your area.  And if there's not, consider starting one yourself or with a fellow neighbor!  

Facebook Marketplace

I've also had a lot of luck buying items on Facebook Marketplace.  Almost all of the people I've bought from have been good at communicating, priced things fairly and were honest about the items' conditions.  I typically pay attention to the seller's ratings and am not afraid to ask questions about the items.  I always ask if the items come from a smoke-free home.  I ask specific questions about the item's condition (for example, are there any rips, stains, scratches, etc.)  Facebook Marketplace is a great way to find toys and other kids' items since kids tend to outgrow items well before they outwear them.  I bought snow pants for the kids this winter.  I've also gotten tons of toys, usually in like-new condition.  I even gave the kids some "like new" Melissa & Doug floor puzzles for Christmas that I found on Facebook Marketplace.  I will usually check Facebook Marketplace first before I consider buying something at a store and usually I can find it!  Archer wanted a bike basket for his bike and I found one for a couple bucks.  I also found twin sheet sets for the kids' new big kid beds.  I'm not afraid to buy anything that can be washed in the washing machine or thoroughly cleaned by hand.  So far I've only bought items that I can pick up locally, though many sellers offer shipping.  

Thred-Up

I tried to limit the number of public places I went this past year due to the pandemic.  That meant shopping for clothes in stores was off the table for awhile.  I tried out Thred-Up and was happily surprised with the results.  Thred-Up is an online consignment store that has secondhand clothes and accessories for women and kids.  It's easy to find what you're looking for using their filters.  Lyla liked a particular brand of jeans, so I was able to find some in the next size up for her.  I also bought a few tops from there for myself.  Buying clothes online is always gamble and you're never quite sure how they'll fit.  Most of the items have a restocking fee of $1.99 if you want to return something.  So I tried to buy only brands that I knew typically fit me well.  Some of the items seem a little high-priced for me, but you can usually find some promo codes to help bring the cost down.  It's certainly not as cheap as some options, but it made for a fun way to get some new clothing items during a pandemic!     

Thrift Stores and Consignment Stores

I am so excited to hit up thrift stores again once I reach full immunity from my COVID vaccine!  I adore thrift stores and it feels like going on a treasure hunt every time I go.  I have gotten quite a few items for my kitchen from thrift stores.  Some of my favorite Pyrex mixing bowls came from thrift stores, along with some very cute cloth napkins.  I also found a gem of a clothing thrift store that I love to get items from.  It's the Savers in Overland Park, KS, if you are in the Kansas City area.  It's kept clean and well-organized.  I've gotten quite a few clothing items for myself and the kids from there.  

Speaking of kids' clothing, my favorite place to get kids' clothing from is Once Upon A Child.  It's a kids' consignment store and they have locations all over the place.  The prices are very reasonable and the clothing is always in very good shape.  We've been super fortunate to have hand-me-downs for Lyla.  (My cousin Becky has two girls and have generously clothed Lyla for her entire life!  This is the same cousin who shared her hand-me-downs with me!)  The majority of Archer's wardrobe has come from this store.  

I've never gotten into selling our used items, but a lot of people do so.  You can sell your kiddo's outgrown clothes and use the money you earn to buy them the next size up!  

The Library

While libraries aren't technically "secondhand," they do offer many resources that you can take advantage of, along with your community members.  

Libraries hold such a special place in my heart.  I remember my mom taking me to the Topeka Public Library and bookmobile as a child to check out books.  I worked at the Columbia Public Library while I was in high school and college.  I helped out at a middle school library for a couple years.  Reading and books are just plain magic and I love that libraries offer up all sorts of these precious resources to their communities for free!  I'm not someone who typically reads books more that once, so checking out books from the library is the perfect option for me.  I read every night before I go to bed, so I always have a stack of library books on my nightstand.  I also still have a DVD player and check out all sorts of DVDs from the library.

Since Archer and Lyla have stopped being so rough on their books (for the most part) we've taken full advantage of checking out all sorts of books from the library.  Public libraries tend to have extensive, diverse, inclusive collections.  It's so important to me that Lyla and Archer are exposed to all sorts of different people, cultures and lifestyles, so we check out a vast array of library books all the time!  

Most public libraries have all sorts of kids' programs (though many are virtual now), like story time and concerts.  They offer up adult programming, like computer literacy and classes led by local business leaders.  They offer assistance for English-language learners.  They have licenses for many online newspapers that you can access with your library card.  The resources they offer their communities just goes on and on!  I definitely encourage you to utilize your public library to access all sorts of resources!  

Choosing secondhand items has had a positive effect on Archer and Lyla.  They are just as happy to receive a secondhand item as they are a new item.  I find that they are happy to share their own items with others easily.  When I told Lyla that my friend was going to have a new baby, she excitedly ran up to her room to get some of her baby doll clothes to share with the new baby.  They see Adam and I setting out items for others to pick up and they are internalizing the importance of sharing our abundance with others.  

While I certainly don't buy everything secondhand, I definitely try to look for secondhand options first.  It's good for the environment and it's good for my wallet!  Happy (Secondhand) Shopping!