Showing posts with label Sustainability. Show all posts

Wednesday, July 6, 2022

My Home Composting Experience

When I first started trying to increase my sustainability efforts, composting was something that kept coming up.  I had heard about it, but didn't really know much about it.  I now understand composting is basically recycling organic matter (think food scraps and yard waste) into soil.  According to the EPA, "Food scraps and yard waste together currently make up more than 30 percent of what we throw away, and could be composted instead.  Making compost keeps these materials out of landfills where they take up space and release methane, a potent greenhouse gas."*  That's a really large percentage of stuff that could literally be prevented from ever going into the landfill!

After doing some very basic research, I decided to just go for it and learn along the way.  In January of 2020 I convinced Adam to put what's considered a digester in our backyard.  A digester is essentially an enclosed compost bin.  (Here's a link to a tutorial you can use to make one of your own.)  I decided an enclosed compost bin was best for our situation.  We still had our sweet dog Jazzy and she loved to eat any and all food.  So we wanted to keep all those food scraps contained and away from her.  Plus, Archer and Lyla were younger and like to explore everything.  We also have lots of bunnies and chipmunks and squirrels and probably other critters I don't care to know about hanging around our yard.  The idea of a compost bin that wouldn't encourage more critters was very appealing.  So we got a garbage bin, drilled holes in the bottom and sides, dug a hole and stuck in the bin!  It was simple and didn't take too much time.  

Once we had our bin in place, we added just a bit of dirt to get things set up.  Then I did some more research to determine what exactly we could put in our compost bin.  You want to have a fairly even mix of green matter and brown matter.  Green matter includes things like fruit and vegetable scraps and grass clippings.  Brown matter includes things like cardboard, twigs and dead leaves.  The EPA's website has a good list of items to get you started.  Here's a list of some of the things we compost: fruit and vegetable scraps (think watermelon rinds, apple cores, potato peels), dead flowers, wine corks (make sure they are actually cork and not plastic), hair trimmings, toothpicks, cardboard, eggshells, parchment paper (make sure it says 'home compostable' on the the box- we use the 'If You Care' brand) and floss (again, make sure it says 'home compostable.')  Some things definitely break down faster than others.  The smaller you break down the items to begin with, the quicker they will break down into compost.  So instead of throwing in a whole cardboard box, rip it up first.  And smush up eggshells instead of throwing them in whole.  You get the picture.  Oh, and remember to remove any stickers from your produce before putting them in your compost bin since they won't break down. 

One thing that has been helpful is keeping a bowl in our freezer for all of our food scraps.  This keeps food from smelling and freezing it first actually helps it break down faster.  It also prevents me from having to go outside anytime I end up with an apple core.  I just toss things in there and then take the bowl outside when it gets filled up.  I might just be weird, but it brings me a nice sense of satisfaction each time I empty a bowl of scraps into our compost bin.   

I was a bit overwhelmed when we first started composting.  I think I checked Google before composting anything because I was worried I would do it wrong.  But composting isn't an exact science.  Even if you don't have an exactly equal amount of green and brown matter, it will still break down.  And after doing it for two years, it's become second nature.  Whenever we go on vacation or visit family that doesn't compost, I feel incredibly weird throwing away banana peels in the trash.  Archer and Lyla even have a pretty good sense of what to stick in the freezer versus the recycling bin or the trash.

Another piece of the composting puzzle is to regularly turn it.  Every once in awhile, when I bring out a bowl of scraps, I will grab a shovel from the shed and stir up all the contents of the compost bin.  Since our bins are buried in the ground, water seeps in the sides and we don't really have to add any water.  If you have a compost bin that's above ground, it's a good idea to give it a spritz of water every once in awhile to help it decompose.  

After composting for about two years, we realized our bin was getting pretty full.  Things were definitely decomposing, but we kept adding in new stuff.  Since it was January, we weren't ready to use it in our garden.  So we decided to add a second bin.  That way, we could stop adding stuff to the first bin and let that totally decompose so it would be ready to use in our garden when we planted it in May.  Looking back, we probably should have added two bins to begin with.  But we figured it out eventually.  

So this past May, I got to add our first batch of compost to our little raised garden.  It was pretty amazing that all those food scraps and cardboard somehow turned into soil!  We had enough to give our whole garden a good layer of compost. 

And look at how happy my garden is!  It is thriving this year and I truly think the compost made all the difference.  I planted lettuce and tomatoes this year.  We enjoyed lettuce throughout June and even had extra to share with our neighbors.     


We've had a few cherry tomatoes ripen so far and they are delicious.  I'm looking forward to even more throughout July and August.  We planted mint way back in 2016 and it comes up every year even though I rip it out continuously throughout the year.  We also had a few volunteer plants pop up this year.  They appear to be vines, so it will be fun to see what we end up with.  Could be pumpkins or cucumbers or watermelon, who knows?! 

With our two compost bins being so successful, we decided to add another compost setup strictly for our yard waste.  Adam got the idea from our neighbor who has a similar setup.  Our neighbor even shared some supplies with us.  (We are truly lucky to have so many sweet neighbors.)  The plan is to put all the sticks we pick up from the yard, along with leaves in the fall and plant trimmings into these bins.  It's divided into three sections.  The first section is where we add stuff to begin with.  Once it starts to break down, we add it to the next section.  Once it's fully broken down and ready to be used as compost, we'll keep it in the third section.  With this system, we'll be able to completely eliminate the need for curbside yard waste pick up.  Plus, we'll end up with more compost for our garden and flower beds around the yard.  

So now I just toss all those random sticks and flowers that I've deadheaded into the first section.  When I'm watering the garden, I give the setup a spritz of water to help things break down a bit more since it's above ground.  I'm so glad Adam came up with this idea.  When we were visiting my parents this past weekend, we had some corn on the cob.  Adam asked if he could bring home the husks for our compost bin and I've never been more in love.  Just kidding, but I do love how he's hopped on board this sustainability train with me.       

Composting has allowed me to reduce our household waste by a lot!  We end up with one trash bag each week and usually it's not even full.  It has also helped our little garden grow.  And I'm so happy this is one small thing I can do to help our planet.  I hope you'll consider giving composting a try!  I'm always here to answer any questions.  

*https://www.epa.gov/recycle/composting-home

Tuesday, May 24, 2022

Tackling Food Waste

To continue my efforts to live more sustainably, I've focused my attention on tackling our family's food waste.  While I don't feel like my family has been super wasteful when it comes to food, we've definitely tossed leftovers and expired food in the past.  My goal has been to eliminate as much food waste as possible.

Here are a few tips and tricks that have helped my family out:

Buy Only What You Can Eat

This sounds so simple, but can be really difficult!  Grocery stores can be so tempting.  That's why I always meal plan and make a list of exactly what I need before I head to the grocery store.  Poor Archer and Lyla have to hear me say, "Not today," several times each trip when they try to get me to buy random stuff.  But I'm a stickler for only buying what's on my list.  I also try to find ingredients that will carry over to other meals if there are leftovers.  For example, if I am making chicken noodle soup, I can use some leftover chicken to make chicken nachos.  

I also tend to just cook and bake the foods I already know how to make.  That way I don't have to buy a bunch of ingredients that I will only use a little bit of and then leave to spoil in the back of my pantry.  Speaking of my pantry, it's pretty small.  It's just one cabinet with four roll-out drawers.  This also helps me not buy too much since I don't have a lot of space to house it.

Figure Out How To Properly Store Your Food

There are lots of little tricks you can do to make your food, especially your produce, last longer.  You can store cut up celery and carrots in jars of water to extend their life.  I keep lettuce in a sealed container with a damp cloth on top to keep it fresher and crisper longer.  It's better to stick berries in the fridge without washing them until you are ready to eat them.  Apples and citrus will keep longer if you refrigerate them.  Tomatoes do best if left out of the refrigerator.  Once avocados ripen, you can put them in the refrigerator and they'll keep for days!  Dry goods should be kept in airtight containers.   

Make Use Of Your Freezer

One thing that has helped me prolong our food and keep things from going to waste is to use my freezer more.  You can freeze a surprising amount of items.  I like to make homemade buttermilk biscuits, but don't want the hassle of making them all the time, so I quadruple my recipe and freeze a bunch.  All you have to do is flash freeze them before storing them.  Just set them out on a plate so they aren't touching and stick them in the freezer.  After about an hour, you can put them all together in one container and store them in your freezer.  I also do this with cookie dough balls.  You can even bake these items while they are frozen just by adding a couple of minutes to the bake time.    

I don't know about you, but sometimes I don't really enjoy eating the same thing for days on end.  So if I'm going to be making a pot roast or something that will yield a lot of food, I'll use half and then freeze half to use at a later date.  I love using jars to freeze meat.  Just make sure to let things cool to room temperature before putting the lid on it and don't overfill it before putting it in the freezer so you don't end up with a cracked jar.  I've been using jars for years and have yet to have anything crack.  I also really enjoy using Stasher bags (reusable silicone bags) to store things in the freezer.  


*I should point out that I know eating meat is not a very sustainable practice.  Maybe one day our family will cut out more meat from our diet, but we're not there yet.  I do get our meat from local farms, so that does help a bit.  I'm reminded of the quote by zero waste chef Anne Marie Bonneau whenever I feel guilty about eating meat: "We don't need a handful of people doing zero waste perfectly.  We need millions of people doing it imperfectly."  

Buy In Bulk

One way to eliminate some of the packaging involved with food is to buy in bulk.  At one of my local grocery stores (Sprouts-I believe they have locations in several different states), they have bulk bins full of dry goods, baking goods, dried fruits, nuts and candy.  I bring in my own little canvas bags, fill them up and then store them in old salsa jars at home.  This way, I don't have boxes and bags to dispose of after we've eaten everything up.  

When I do buy items that come with packaging, I opt for the largest-sized amount that will actually get eaten.  For example, Archer adores Cheeze-Its.  Instead of buying the pre-portioned individually wrapped kind, I opt for the large family size box and divvy it up myself at home.     

Consider Your Portions

I've tried to do a better job of cooking the correct portion of food for each meal.  I always used to make way too much pasta when I was making a pasta dish.  And I would save the extra cooked noodles and then end up throwing it away after it sat in my fridge for a week.  So now I cook only what I need and resist the temptation to add "just a few more noodles, just in case."  

I also try to portion out food on my family members' plates according to what I know they'll likely eat.  I err on the side of too little since they can always ask for more.  I know Archer will likely only eat the one required bite of pasta I put on his plate and not much more, whereas Lyla will eat a big heaping pile and then some.      

Compost

One of the best ways to prevent food waste, reduce the production of methane and end up with an end product that will make your garden happy is to compost.  I've been composting my food scraps for a few years now and am happy to report it's simple and easy to keep up with!  I plan to write a a post about my composting experience soon since I used my compost to plant my garden this spring.   

Donate Or Offer Up Food You Won't Eat

If you end up with food that you know you won't eat and it's unopened and not expired, consider donating it to your local food bank.  Or you could ask other family members or neighbors if they would like it.  I love to bake, but don't need to eat entire loaves of bread or batches of cupcakes, so I often share with our neighbors.  I've spoken before about Buy Nothing Groups (you can find your group by searching "Buy Nothing Group + your city" on Facebook or there is a new app you can download from the App Store or Google Play) and this is also a good way to offer up food you won't eat.  In my group, people will give away food that's been opened and people are generally okay with that as long as you disclose that information up front.

So these are my best ideas for preventing food waste.  I'm so proud of my family for taking these steps with me to prevent food waste.  We're not perfect, but being more mindful has certainly improved our behaviors around wasting food.  Let me hear your tips and tricks!  What other habits can I adopt to help eliminate food waste?    

Friday, July 9, 2021

Old Porch Posts + Old Deck Spindles

We've been on a bit of a table kick around here.  Not too long ago, Adam refinished a table for our kitchen.  Most recently, he used up our old porch posts and old deck spindles to create a gorgeous new table for our deck.  With the exception of a few cedar boards for the center of the table top and the bench slats, Adam created a whole dining set using repurposed lumber!  All of the old lumber would have just been hauled off to the landfill, but with Adam's hard work and skill, we now have the perfect addition to our deck.  


Allow me to go back to the beginning of the project and give an extremely simplified description of all the work Adam did.  There were too many steps for me to keep track of and I definitely didn't do the best job of photographing all the steps.  (In all fairness, I was wrangling Archer and Lyla so Adam could work on it.)  

In the midst of the pandemic, Adam was searching for projects to do that would keep him busy, but the high cost of lumber limited what he was willing to tackle.  Luckily, he had a pretty good stockpile of random lumber.  Adam had thought to save the old front porch posts from when we replaced them with new cedar columns.  He also saved all the spindles from the deck when we replaced them with cable rails.  This lumber had been sitting in our shed, awaiting the perfect project.  


After tackling the deck, we decided we needed a bigger table with more character and more seating.  So Adam got to work designing a new table and some benches using the lumber we already had on hand.  After he had his design, the next step was to plane all the spindles.  He took these worn out spindles for a trip through his planer... 


...and brought them back to life!  


He then laminated the spindles together to form planks for the table top.  This step took lots of patience.  After spindles were laminated into planks, he sent the planks through the planer again to get everything smooth.  He did have to supplement one cedar plank down the center of the table top since there weren't enough spindles to make the entire tabletop.


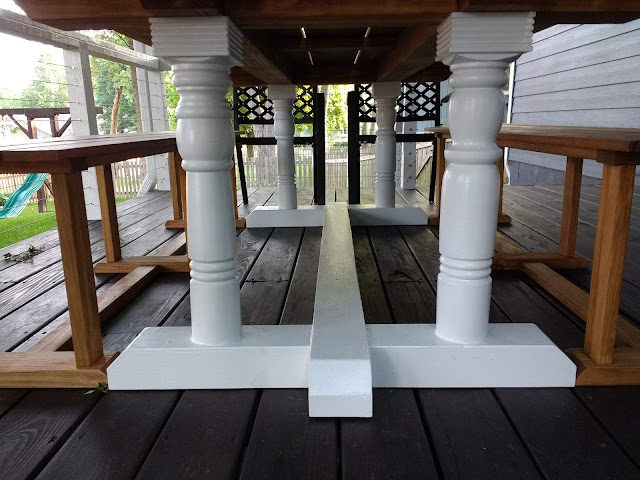
The base of the table came next!  He used leftover lumber and our old front porch posts to build the base.  Since the porch posts were already painted white, Adam decided to keep the base white.  Stripping and sanding off the paint would have been quite the job with all those nooks and crannies!  


The white base adds a bit of contrast and also ties in with the white railing posts.  


Adam had plenty of leftover planed lumber to build the bench bases.  Since those were nicely planed, he decided to stain those the same color as the table top.  He did have to grab a few more cedar boards to create the bench seats.  


Finding the perfect color to stain the table top and benches was quite the feat!  We wanted something to contrast the dark color of our deck, but still complement it.  After looking at several samples, we settled on a stain that turned out to be way too orange in person.  Ultimately, Adam decided to use Osmo Decking Oil in the color Thermowood.  It's the same product we used on our deck and have been very impressed with how well it's held up!  


Since we wanted to optimize seating, we decided to add two additional chairs to each end of the table.  Adam's mom was able to use our old patio table and chairs, so we opted to buy some chairs with a smaller footprint.  We also wanted to ditch the chairs with cushions since they would get wet when it rained, despite our covered deck.  The benches can seat 3 adults comfortably and 4 in a pinch.  So we can now seat up to 12 people!  We have already eaten many meals at the new table and enjoy spending time sitting around it.  


(At least Adam will look at me when I trying to take a picture these days...)


Our new dining set is the perfect addition to our outdoor living area!  It fits the space nicely, without taking up too much room.  There's still plenty of room to play and grill up dinner.  


I love that Adam built it.  I love that he saved materials from the landfill.  I love that it brings our family even closer together.    


Wednesday, May 19, 2021

Not Bad For A Pair Of Old Jeans

It's always a sad day when your favorite pair of jeans decide to give up on you.  I'm someone who finds a pair of jeans that I like and then I wear them every day until they start to fall apart.  When my latest pair of jeans decided to rip, I was about ready to find somewhere to recycle them.  But then I stopped and asked myself if I could use them for something else.  


I briefly looked at Pinterest for some inspiration and saw lots of clever ideas out there.  One idea that caught my eye was a tool belt.  Archer would love a tool belt!  I just cut around the waistband and back pockets.  The original waistband was obviously too big, so I trimmed off the excess and just cut a new button hole.  I didn't worry about finishing off the edges or anything.  


It was a hit with Archer!  He was so excited and couldn't get his tools in there fast enough.  He's worn it all morning and wouldn't take it off for rest time.  Not bad for a pair of old jeans!  


Of course I couldn't leave Lyla out.  I decided she would adore a purse, so I got to work piecing together the rest of my old jeans.  I didn't follow a tutorial or pattern; I just kept sewing random things together.  I used the denim from the legs to make the bulk of the purse and sewed on the little coin pocket to the front.  I braided some long strips together to make the handles.  Then I used some scraps of denim to make some cute flowers using this technique.      


While it's far from perfect and a little wonky, Lyla was delighted by it!  She told me it would be the perfect way to carry her night night (the blanket she sleeps with) so it wouldn't drag on the ground.  


Finally, I wanted to find something to do with all the leftover seams.  This idea caught my eye and I thought it would be perfect to use as a hot pad for hot pots and pans on the counter.  I only ended up with enough seams to make a coaster, but it still turned out pretty cute!  


Creating some new items for my kids was the perfect use of this rainy day!  And it was the perfect use of a pair of old jeans!  I really do enjoy doing crafts and putting my creativity to the test.  Doing these projects reminded me I need to make more time to do stuff like this.  It's important for Archer and Lyla to not only see me doing things I love, but to also model how to use our old items in new ways.   


I was also able to find another pair of my beloved jeans on Poshmark!  Poshmark is an online marketplace for secondhand items.  I found another pair of my exact jeans that had only been worn once and cost a fraction of what they would if I were to have bought them new!  Not too shabby. 

Monday, May 3, 2021

Choosing Secondhand First

In an effort to live more sustainably, I have been trying to choose secondhand items before buying new items.  Giving used items a second life prevents them from ending up in landfills and it saves me money too!  There are an overwhelming number of secondhand options out there.  It's been surprisingly easy to find specific, quality items. 

I also find myself enjoying secondhand items more than new items because they come with a history.  For example, the table Adam recently refinished for our kitchen was from his childhood.  We found out from his dad that it was actually bought in Guam, where his parents were stationed when Adam was born!  How fun is that?!  We also recently bought a Pottery Barn bed for Archer on Facebook Marketplace.  After talking with the sellers, we learned it had been their 15 year old son's childhood bed.  It made me happy to know it would continue on in another little boy's life and I think it made the sellers feel better knowing it would live on as well.

My goal in sharing about my love of buying pre-loved items is to help normalize secondhand shopping.  Secondhand items often get a bad rap.  People tend to assume they somehow have lesser quality and there's a social stigma for using secondhand items.  I grew up going to garage sales with my mom and getting hand-me-downs from my cousin Becky.  I've appreciated those items just as much (often even more!) than new items I've received.  

Here are some of my favorite ways to get excellent-quality secondhand items: 

My Buy Nothing Group 

I recently came across something called The Buy Nothing Project.  The mission of the project states: "We offer people a way to give and receive, share, lend, and express gratitude through a worldwide network of hyper-local gift economies in which the true wealth is the web of connections formed between people who are real-life neighbors."  Basically, you can join a group (the groups are on Facebook at this time, though they are working on a separate app) based on where you live.  Once you've joined a group, you can gift items you no longer need or want or ask for things you do need or want.  It's such a special way to connect with your neighbors.  

I have been able to pass along a lot stuff I wasn't using and give it to people who could actually use it.  I have also greatly benefited from my neighbors' generosity!  I have asked for and received tomato cages for my garden, a mini muffin pan, a shepherd's hook for my hummingbird feeder, dresses, doll clothes, board games and more!  The gratitude piece of the project really makes the group special.  I shared some of Archer's pajamas that he outgrew with someone in our group.  She sent me a picture of her son wearing Archer's outgrown pajamas and it warmed my heart so much!

My enthusiastic participation in the group led me to become one of the group admin.  I highly encourage you to see if there's a group in your area.  And if there's not, consider starting one yourself or with a fellow neighbor!  

Facebook Marketplace

I've also had a lot of luck buying items on Facebook Marketplace.  Almost all of the people I've bought from have been good at communicating, priced things fairly and were honest about the items' conditions.  I typically pay attention to the seller's ratings and am not afraid to ask questions about the items.  I always ask if the items come from a smoke-free home.  I ask specific questions about the item's condition (for example, are there any rips, stains, scratches, etc.)  Facebook Marketplace is a great way to find toys and other kids' items since kids tend to outgrow items well before they outwear them.  I bought snow pants for the kids this winter.  I've also gotten tons of toys, usually in like-new condition.  I even gave the kids some "like new" Melissa & Doug floor puzzles for Christmas that I found on Facebook Marketplace.  I will usually check Facebook Marketplace first before I consider buying something at a store and usually I can find it!  Archer wanted a bike basket for his bike and I found one for a couple bucks.  I also found twin sheet sets for the kids' new big kid beds.  I'm not afraid to buy anything that can be washed in the washing machine or thoroughly cleaned by hand.  So far I've only bought items that I can pick up locally, though many sellers offer shipping.  

Thred-Up

I tried to limit the number of public places I went this past year due to the pandemic.  That meant shopping for clothes in stores was off the table for awhile.  I tried out Thred-Up and was happily surprised with the results.  Thred-Up is an online consignment store that has secondhand clothes and accessories for women and kids.  It's easy to find what you're looking for using their filters.  Lyla liked a particular brand of jeans, so I was able to find some in the next size up for her.  I also bought a few tops from there for myself.  Buying clothes online is always gamble and you're never quite sure how they'll fit.  Most of the items have a restocking fee of $1.99 if you want to return something.  So I tried to buy only brands that I knew typically fit me well.  Some of the items seem a little high-priced for me, but you can usually find some promo codes to help bring the cost down.  It's certainly not as cheap as some options, but it made for a fun way to get some new clothing items during a pandemic!     

Thrift Stores and Consignment Stores

I am so excited to hit up thrift stores again once I reach full immunity from my COVID vaccine!  I adore thrift stores and it feels like going on a treasure hunt every time I go.  I have gotten quite a few items for my kitchen from thrift stores.  Some of my favorite Pyrex mixing bowls came from thrift stores, along with some very cute cloth napkins.  I also found a gem of a clothing thrift store that I love to get items from.  It's the Savers in Overland Park, KS, if you are in the Kansas City area.  It's kept clean and well-organized.  I've gotten quite a few clothing items for myself and the kids from there.  

Speaking of kids' clothing, my favorite place to get kids' clothing from is Once Upon A Child.  It's a kids' consignment store and they have locations all over the place.  The prices are very reasonable and the clothing is always in very good shape.  We've been super fortunate to have hand-me-downs for Lyla.  (My cousin Becky has two girls and have generously clothed Lyla for her entire life!  This is the same cousin who shared her hand-me-downs with me!)  The majority of Archer's wardrobe has come from this store.  

I've never gotten into selling our used items, but a lot of people do so.  You can sell your kiddo's outgrown clothes and use the money you earn to buy them the next size up!  

The Library

While libraries aren't technically "secondhand," they do offer many resources that you can take advantage of, along with your community members.  

Libraries hold such a special place in my heart.  I remember my mom taking me to the Topeka Public Library and bookmobile as a child to check out books.  I worked at the Columbia Public Library while I was in high school and college.  I helped out at a middle school library for a couple years.  Reading and books are just plain magic and I love that libraries offer up all sorts of these precious resources to their communities for free!  I'm not someone who typically reads books more that once, so checking out books from the library is the perfect option for me.  I read every night before I go to bed, so I always have a stack of library books on my nightstand.  I also still have a DVD player and check out all sorts of DVDs from the library.

Since Archer and Lyla have stopped being so rough on their books (for the most part) we've taken full advantage of checking out all sorts of books from the library.  Public libraries tend to have extensive, diverse, inclusive collections.  It's so important to me that Lyla and Archer are exposed to all sorts of different people, cultures and lifestyles, so we check out a vast array of library books all the time!  

Most public libraries have all sorts of kids' programs (though many are virtual now), like story time and concerts.  They offer up adult programming, like computer literacy and classes led by local business leaders.  They offer assistance for English-language learners.  They have licenses for many online newspapers that you can access with your library card.  The resources they offer their communities just goes on and on!  I definitely encourage you to utilize your public library to access all sorts of resources!  

Choosing secondhand items has had a positive effect on Archer and Lyla.  They are just as happy to receive a secondhand item as they are a new item.  I find that they are happy to share their own items with others easily.  When I told Lyla that my friend was going to have a new baby, she excitedly ran up to her room to get some of her baby doll clothes to share with the new baby.  They see Adam and I setting out items for others to pick up and they are internalizing the importance of sharing our abundance with others.  

While I certainly don't buy everything secondhand, I definitely try to look for secondhand options first.  It's good for the environment and it's good for my wallet!  Happy (Secondhand) Shopping! 

Friday, January 1, 2021

Our New Old Kitchen Table

Allow me to introduce you to the biggest annoyance in my house, my dining room table.  While it's in good shape and does it's job, it has a very annoying feature.  Cracks.  Lots of cracks for crumbs and peanut butter and play dough and milk to settle into.  After every meal and craft and activity, I have to not only wipe down the table, but painstakingly clean out the many cracks of all the leftover debris.  I realize this is a very minimal problem, especially given the current global pandemic.  

But it was annoying enough for me to repeatedly complain about it to Adam.  So we started brainstorming some solutions.  Eventually we would love to exchange our pub-height dining room table with a standard-height round table.  The pub height just isn't ideal for our older family members or kids, so we think a standard-height table is the way to go.  It'd also be nice for the future round table to have multiple leaves so we could seat bigger groups of people for things like Thanksgiving and birthday parties.  (Fingers crossed we can safely gather by next Thanksgiving!)  Recently, Adam and I have tried to shop secondhand before buying something new.  We looked at a few tables on Facebook Marketplace that were either in need of refinishing or completely refinished.  Although we liked a few, we decided now just wasn't the right time to be going into strangers' houses to look at furniture.    

So then we turned our attention to the small pub table we have in our eat-in kitchen area.  It's really tiny and just doesn't comfortably fit four people.  But we have the space in the area for a larger table.  As luck would have it, there was a table in our basement that was from Adam's childhood home.  It was still sturdy, but looked a bit dated, despite caning being back in style.  But it was standard-height, the perfect size for the space and even had rounded corners as an added safety feature!  

After taping out the table size in our eat-in kitchen area, we were convinced it would be the perfect fit.  Now we just had to update it.  

Adam first tried sanding down the top to see if it could be re-stained.  He figured out it was just a wood laminate top over particle board, so staining wasn't an option.  Then we moved onto the idea of painting it.  Adam had some milk paint (General Finishes Milk Paint in Driftwood) in the basement that would cover up the laminate/particle board top.  The color was very close to the color of our kitchen cabinets so we felt it would tie in nicely with the overall aesthetic of our kitchen.

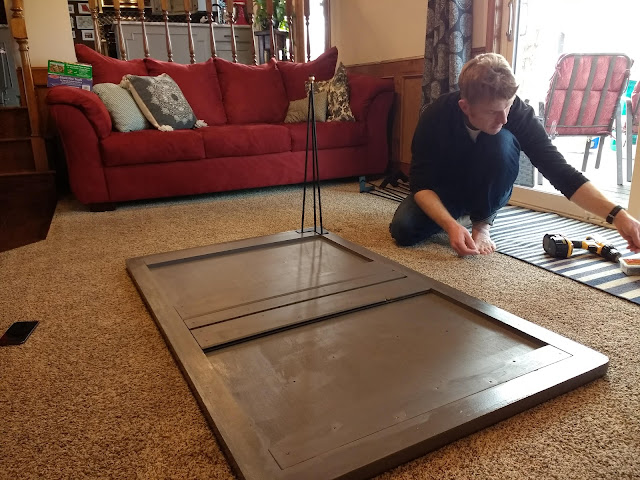
So Adam put on four coats of the milk paint, followed by four coats of a water-based topcoat in a satin finish.  This process resulted in a very even, smooth finish.  He also added some bracing to the bottom of the table to make sure it was nice and sturdy in case Archer or Lyla have any table dancing in their futures.  Adam decided to paint the bottom of the table (he only did one coat of milk paint) since the bottom of the table is visible from below in the family room.        

Once the table was painted, then we had to figure out what to do about the base of the table.  The original base was a bit bulky and would be difficult to paint given the caning.  We've always liked the look of hairpin legs and thought they would be the perfect way to update this old table.  After doing some research, Adam settled on an Ohio-based company so we could support a small business here in the United States.  We picked out some black powder-coated legs with the perfect little brass detail on the foot.  

The final piece of the puzzle was figuring out what to do for seating around the table.  We couldn't reuse the stools because they were pub-height, so we needed some standard-height chairs.  If it weren't for the pandemic, we'd definitely taken the secondhand route and picked something from Facebook Marketplace or Craigslist.  But we ended up going with these.

All the painting and curing and assembling was wrapped up just in time to enjoy our dinner on New Year's Eve around our new old table.  I'm in love with how it all came together!  I'm glad we were able to reuse an old table, but still update it to make it fit our style.  The gray works so well with the kitchen cabinets.  Our previous table was very similar in color to our wood floors, so it just sort of blended in.  But now our new table stands out in the best way!  


The legs are minimal and modern and tie into the other hits of black we have going on in our kitchen, like the appliances and cabinet hardware.  The black chairs also tie in nicely, while also being comfortable and somehow fit Adam, myself and the kids remarkably well despite our varying heights.  I might see if I can find some chair cushions secondhand in the future.  While the chairs are perfectly comfortable for a meal, a game of Liverpool (anyone else's family play this card game?) would be much more comfortable with a little extra padding.  


And I further broke my attempts at shopping secondhand to buy some silicone place mats for Archer and Lyla (alphabet & rainbows) hoping they will help protect the tabletop longer.  Both Adam and I realize scratches and dings are bound to happen, but thought the place mats would help.     

Adam produced another win!  Our nightly family dinners (& lunches thanks to Adam working from home) will be just a little bit more special gathered around this new old table.  

Want to guess the part I love most of all?  There are no cracks! :)         

Wednesday, June 10, 2020

Lyla & Archer Get a Swing Set!

Adam has been busy building a swing set for Archer and Lyla!  Since we've been spending our days at home now, we decided the kids could use some more outdoor activities in our backyard.  Adam and I always planned to build them some sort of swing set, but weren't in any huge hurry.  However, the pandemic made us decide to build it sooner rather than later.  It's safe to say it was an excellent idea given the sheer number of hours Archer and Lyla have already clocked playing on it.  (Lyla sure knows how to sit back and let me do all the work pushing her.)


But let's back up and talk about how the swing set came to be.  We had lots of lumber to work with since we're in the process of reworking our back deck.  Our whole exterior has undergone some big changes that I'm excited to share with you soon!  One of our projects has been reworking our existing back deck.  It's always been a little wonky and Adam didn't like that it wasn't structurally sound.  So while the siding on our house was being replaced, we decided to have a portion of the covered deck taken down by the siding crew.  Adam marked the lumber that was salvageable and the workers set it aside for us.  That meant we had plenty of lumber to use to build the new swing set.  It was all Adam's idea to reuse what we had and it made me so happy!  Trying to create less waste has been a major goal of mine and this was the perfect way to reuse and re-purpose something we already had on hand. 

After looking for some inspiration on Pinterest, I found this image.  It led to a company based in the Netherlands, so it wasn't much help to us.  But we still used it as our guide.  I loved the simplicity of it and the small footprint.  We don't have a huge yard and there isn't a lot of space that is flat.  So this seemed like it would fit our yard and still look nice.  As much as I love my children, I don't want our yard to look like a public playground.  

Adam created some plans and pieced together the wood we had to create the posts that would go on either side of the slide and the beam that would go across the top.  He ended up planing and sanding all the wood, which brought it all back to life!  He also planned to use some of our discarded deck railing to make the ladder that leads to the slide.  And luck would have it that I spotted the slide on someone's curb by their trash on one of my daily walks with the kids and Jazzy.  I figured it must have been cracked or damaged to be put in someone's trash.  But I decided to scope it out just in case.  It looked like it was in good condition, so I told Adam about it when we got home.  Since he's working from home, he just hopped in his car and picked it up.  So not only was the wood free, but so was the slide!  And we saved it from the landfill and gave it a second life. 

While we already had the swings (Thanks, Grandma Sandy!), we did have to order some hanging hardware for them.  Adam also thought some handles would be a good idea to help the kids transition from the ladder to the slide.  The only other materials we needed were some Sonotubes and concrete to set the posts in.   

Once Adam had his plan in place, he started by digging the holes for the posts.  I'm glad that wasn't my job because it seemed like a lot of work!  


With the holes dug, Adam got to work setting the posts.  He put a Sonotube in each hole, got the posts all situated and finally mixed and poured the concrete.  He wanted to make sure this swing set was nice and stable for years to come.  I think it's safe to say that swing set isn't going anywhere anytime soon!   


Archer and Lyla enjoyed watching all the steps in the process.  They even helped add some dirt around the posts and "hammered" some boards.  We kept telling them that Daddy was building them a swing set, but I don't think they quite grasped the concept.  They were still happy to watch what Adam was up to while playing in their turtle rock box.  


After the posts were in place, assembling the rest of the pieces came next.  I don't have any pictures of the process because Adam seemed to get everything put together pretty quickly!  Once the swing hanging hardware was installed, the slide was attached and the handles were in place, it was ready to go!  I had grand plans of taking video of the kids as we unveiled it to them for the first time all complete, but they managed to sneak outside before Adam and I got there so we missed their initial reactions.  They saw it from our sliding glass door and couldn't get out there fast enough!  It's safe to say they love it and have already spent many hours playing on it.  


Lyla and Archer are super lucky to have such a hard-working, giving dad.  And I'm super lucky that I have a husband who can whip up a real-life version of whatever picture I show him.  I foresee us spending lots of time in our yard this summer as a family.