Sunday, October 30, 2016

Siding and A Window and Plywood Roofing, Oh My!

Time for another shed update!  Adam has been plugging away at our adorable shed.  It's looking cuter and cuter with each new addition!  Here's what it looks like now:   


As you can see, Jazzy is also a fan.  Since we last caught you up on shed progress, Adam has added siding, installed one of the windows and added plywood to the roof.  The siding matches the siding we have on our house, so the two will tie in together nicely.  It came primed, but it is actually pretty close to the color of our house.  After we caulk up all the screws and any gaps and add the trim pieces, it will be ready for its final coat of paint (or two, depending on the coverage.)  


One of the windows has been installed.  They really help the shed look much nicer and more like an extension of our house.  They even have a screen on them and can be opened up.  Adam made sure to install them so that moisture will stay out and prevent any sort of water damage or rot.  


Adam also managed to put plywood on the roof.  This will become the base for the shingles.  We decided finding shingles that match the ones on our house will also help make the shed a little bit fancier.    


It is certainly coming along nicely!  I might just have to move in once it's all complete.  Look at that view!


Check out all the other shed updates here, here, here and here.  

Saturday, October 29, 2016

Mums

Mums are synonymous with fall to me.  So whenever fall rolls around, I always pick up some mums to plant in the big pot in the front of our house.  Mums are super hardy, so they can withstand cooler temperatures.  They also come in lots of pretty colors.  Last year I went with bright yellow.  But this year I picked out some pinkish-purple ones.  


They always seem to do very well in this location.  I make sure to water them at least every other day and they get to soak up the morning sun in the front of the house.

In addition to adding some cheer to the outside of our house, I also use mums to brighten up the inside of our home.  Mums last for a long time after they have been cut.  So I sprinkle them throughout the house.  I stick some in my nightstand caddy.    


I fill up the mason jar centerpiece on the dining room table.  It adds some nice fall charm while we're eating dinner.  At least on the rare occasion we eat dinner at the table instead of in front of the tv.    


I also added a small little bouquet of mums in our half bathroom.  It ties in nicely with the Mrs. Meyer's mum-scented hand soap I recently found at Target.  


I've had the mums in our half bathroom for over a week now and they are still going strong.  When they eventually do bite the dust, I can always cut some more from the pot out front.  I spent six bucks on the mums for the pot, which is pretty inexpensive.  Especially when you consider all the different ways you can decorate with mums inside your home.  

Friday, October 28, 2016

Bummer

Our sixth IUI did not do the trick.  Jazzy and I are bummed about it.  Adam is bummed about it.  We are all just plain bummed.    

  
Adam and I are going to take some time to decide which steps we want to take next.  However, we so appreciate all the kind words, happy thoughts and sweet prayers everyone sent our way in hopes that the IUI would work.  We thank you from the bottom of our hearts.  

Tuesday, October 25, 2016

Jazzy Goes to the Vet

It was time for Jazzy to get her yearly shots and checkup, so Adam and I took her to the vet.  I think I might be more scared of the vet than Jazzy.  I'm always afraid they are going to find something wrong with her.  That's why I make Adam go with us.  


Jazzy was a very good girl during her trip to the vet.  She didn't seem to be as nervous as she usually is. She typically starts shaking and won't leave our laps.  But this time around, she seemed to be cool as a cucumber.  She even sat by herself at one point.

It also surprises me that she never barks at any of the other dogs in the waiting room.  There must be some sort of doggy code that they all agree to.  They seem to agree that they are all in the same boat while waiting for the vet so they decide not to hassle each other.  

Once Jazzy's name was called, she got weighed before we went to the exam room.  She was down a pound, which is good news.  All her walks must have helped out!  

Then we got to wait for the vet to come in.  While we were waiting, a vet tech came to trim her nails while we were waiting.  It still baffles me that it takes them about two minutes to trim her nails.  The one time Adam and I tried to cut her nails, we spent about thirty minutes wrangling her and only got two nails cut!  That silly little girl.  She has us fooled.    


After her nail trim, she came back to the exam room and felt it was time to go.  She waited very patiently by the door. 


Unfortunately, she had to wait around for the vet to administer her yearly shots.  The shots were a breeze for Jazzy.  She didn't even flinch or act like she even felt the needles! 

Once the shots were out of the way, the vet gave her a quick checkup.  He pointed out her heart murmur. We've known that she has a heart murmur, but luckily it hasn't seemed to slow her down at all.  She goes on two walks a day, a run in the evening and will play with us in between.  This particular vet we saw seemed to be a bit more concerned than the other vets we've talked to in the past.  He pointed out that heart murmurs can lead to breathing difficulties and suggested we go visit a cardiologist if we had the means.  I don't even want to think about what it would cost for a visit to the cardiologist.  Since Jazzy hasn't shown any concerning behaviors or side effects, we decided to hold off until it becomes necessary.  

The vet also pointed out that her teeth have gotten some more tartar growth since her teeth cleaning.  I hated making Jazzy do that since they have to put her under anesthesia.  That's definitely not good for her heart.  But neither is plaque.  So we have decided to hold off on getting her teeth cleaned by the vet and just focus on brushing her teeth more regularly at home.  

Adam has kindly accepted that job.  Jazzy seems to like it when he brushes her teeth more so than when I do.  The two of them seem to have a system down.  It looks a bit like torture for both of them while it's going on, but they get the job done.  So now Jazzy gets a daily teeth-brushing.    


Other than her heart murmur, Jazzy is doing great!  She's a healthy, happy little dog.  And Adam and I are so incredibly lucky that she is our dog child.    

Thursday, October 13, 2016

Ding-Dong

When Adam and I were installing the cedar shutters to the front of our house, Adam pointed out how cruddy our doorbell button was looking.  


I hadn't even noticed until he pointed it out, but he was right.  The plastic was yellowing and a crack was starting to form on the part that you push to ring the doorbell.  It never crossed my mind that you could replace a doorbell button.  It turns out that it is a very simple project and can add a lot of charm to the front of your house.

I learned a couple things about shopping for replacement doorbell buttons.  One thing is that the distance between the screw holes can vary.  We initially bought one at Lowe's, but had to return it because the distance between the screw holes didn't match up to our old ones.  If you are adding new holes, this doesn't matter.  But we wanted to use the anchors that were already in our brick instead of filling in the old holes and drilling new ones.  So my advice would be to figure out what measurements you need before you go shopping and to bring along a tape measure.

The second thing I learned is that some doorbell buttons have parts that stick out on the back.  I picked one at at Home Depot, but realized I will have to return it as well because the back of it stuck out too much.  I finally hit the jackpot with a flush mount doorbell button from Ace.  I tried to find it on Ace's website, but couldn't.  Here it is on the manufacturer's website.      

I liked the bronze finish.  The shape seemed a bit fancier and would fit in with the front of our house. Since our previous button was hard-wired, we needed to make sure we selected a wired button.  Some doorbell buttons are battery-operated.  You just have to remove your old doorbell button to find out.

Adam was going to replace the doorbell button, but he had to work late.  I thought to myself, this can't be that hard.  So I went for it.  

I knew enough to make sure I turned off the breaker that controlled the doorbell button.  It was a bit tricky figuring out which was the correct breaker.  The labels weren't all that helpful.  I tried a few random ones first, with no luck.  So then I went about it with a more systematic approach.  I started at the top left corner and worked my way down.  I didn't find the correct breaker until halfway down the right side.  


To make things more fun, Jazzy barked each time I rung the doorbell to see if I had cut off the power to it.  So things went like this:  Go downstairs, flip a breaker, go upstairs, ring the doorbell, listen to Jazzy bark, go back downstairs, flip a different breaker, go upstairs, ring the doorbell, listen to Jazzy bark, and so on and so forth.  I certainly got my exercise!   

Once I had the correct breaker flipped, I unscrewed the old doorbell button to see what I was working with.  There were two wires attached to two screws.  It didn't appear to matter which screw went to each wire after carefully reading the instructions on the back of the doorbell button.  So I unscrewed the screws until the wires were released.  I then attached the wires to the screws on the new doorbell button.    


From there, all I had to do was screw the button into the anchors that were already in the brick.  It was as easy as that!  I was pretty proud of myself for tackling this project.  I was a bit daunted by doing something electrical without Adam looking over my shoulder to make sure I was doing it right, but I'm so glad I tried it!  It was simple and I feel pretty darn accomplished.   


After it was all screwed in place, I flipped the breaker back on to make sure it worked.  It lit up and rang like a champ when I pushed it!  


While I don't plan to tackle any complex electrical plans in the near future, I do have a little more confidence under my belt to try even more new things.  I try to be a good role model for Jazzy. Unfortunately, I think she was more enamored of Bob mowing his lawn across the street than my lesson to try new things.  Oh well.    

Monday, October 10, 2016

Raise the Roof

Our shed now has a roof!  A roof structure, that is.  This past weekend, Adam added the framing that will hold up the roof of the shed.  I would call it a roof skeleton.  But that's certainly not the technical term. Allow me to explain how the roof skeleton came to be, in Adam's technical terms.  

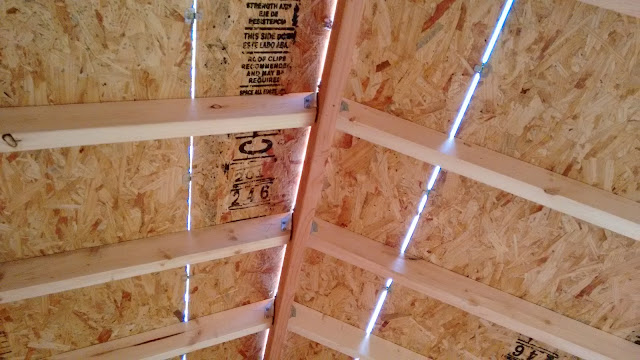
The first thing Adam had to do to add this gable roof was to put two cradle supports on both of the side walls of the shed.  One of the cradle supports is featured in the photo below.  It's the thingy that looks like three boards were put together in the bottom center of the photo.  Having a cradle support on each side of the shed gives the ridge beam something to rest on.  The ridge beam is the long board that runs the length of the shed, which happens to be the board running down the center of the photo below.  Once the ridge beam was in place, Adam used rafter joist hangers (those silver thingys) to attach roof joists from the ridge beam to the top of the shed walls.  The roof joists are the pieces of wood running diagonally in the photo below.      


Whew!  Are you still with me?

When Adam's weekend of construction was all said and done, he had the roof skeleton all put up!  


I went with him to Home Depot, our home away from home, to buy more supplies for the next steps in the shed-building process.  I learned all about things like drip edges, shingles and construction adhesive.  I can't wait to see how all those supplies make their way into the shed!     

Follow along with our other shed posts here, here, and here

Friday, October 7, 2016

Pushing the Trigger

Yes, I do mean pushing and not pulling the trigger.  The trigger I am referring to is the trigger shot I had to give myself the other day.

Allow me to back up and explain everything.  I recently shared how Adam and I will be doing our sixth IUI this month.  We are trying out some different medication this month and have a very positive outlook, which we are hoping will result in a healthy pregnancy.  

I went in for an ultrasound of my follicles a few days ago.  Follicles are basically sacs in your ovaries that could produce an egg.  An ultrasound is done to check out how many follicles you have and to measure their size.  I am happy to report I had a great-looking follicle with the right measurements.  I had two other smaller follicles, but they weren't as big as we'd like them to be and won't likely produce any eggs. But all you need is one good one.  Since it looked like my follicle was ready to go, the doctor told me to give myself an Ovidrel shot to trigger ovulation that evening.  

While I can't think of many people who are big fans of needles, I am especially scared of them.  I am a wreck anytime I have to get my blood drawn or get shots.  So the thought of having to not only get a shot, but administer it to myself was enough to make me very jittery.  I did give myself a trigger shot the last time we did an IUI, so I had a little experience.  It wasn't that bad, but the thought of having to do it again was still scary.  

When I went in for my follicle ultrasound, one of the nurses was kind enough to show me exactly what to do when giving myself the shot.  Basically, you just pinch the fat on your belly, stick in the needle, let your skin go, push the plunger, let it sit for 10 seconds and then pull it out.  The nurse made it seem very simple and I felt like I could handle it when I left the office.  

I had orders to give myself the shot that evening.  So I laid everything out and tried to work up enough courage to go for it.   


I let the shot sit on the table for 10 minutes to come to room temperature since it was being kept in the fridge.  The more I looked at it, the more daunting it seemed.  But eventually I worked up enough courage to just do it.  

And honestly, I didn't even feel the needle go in.  I could tell where I had given myself the shot, but it didn't hurt at all.  I had gotten myself all worked up for nothing!  

Next up is the IUI!  Adam and I are in good spirits and very hopeful that we'll end up pregnant.  Here's hoping!  

Thursday, October 6, 2016

My Oven Cleans Up Its Act

I made some pizza the other day and some grease from the pepperoni leaked through the pan.  I was using one of those pizza pans with the holes in the bottom, which made me wonder if a crispy crust was really worth the burnt pile of smoking grease that now resided in the bottom of my oven.  The glass door was also disgusting.  Allow me to show you.  


It was high time to clean out my oven, especially since it's something I haven't ever done.  I didn't want to use any toxic oven cleaners, so I did a bit of research to find the best natural oven cleaner.  Website after website claimed all I needed was baking soda.  It sounded simple enough, so I thought I would give it a shot.


Adding a little water to a bowl full of baking soda made a paste, which I then smeared all over the inside of my oven with my hands after removing the oven racks.  Most of the websites recommended letting the baking soda paste sit awhile, so I decided to let it sit while I made dinner.  I made a delicious Pioneer Woman dish for dinner.  Spinach Artichoke Pasta might be my new favorite recipe because it is easy to make and delicious!


After dinner, I got busy scrubbing the inside of the oven.  I poured a splash of vinegar on the baking soda paste just to give it a little extra oomph.  Jazzy had to come check out what was going on, but quickly lost interest.  


It would have been nice to have a helping paw, er hand, for scrubbing.  I used a Mr. Clean Magic Eraser and that worked pretty well on the oven itself.  It looked a heck of a lot better after the scrub down than before.  There was, however, a few tiny black spots that wouldn't go away no matter how much I scrubbed.  But the grease and baked on food spots on the glass door weren't going anywhere!    


So I decided to try putting a thicker coat of baking soda paste on there.  After letting it sit for about 20 minutes, I tried scrubbing it clean again.  I tried using a washcloth this time.  I could get the grime off but it was slow-going and used up lots of elbow grease.  It's a good thing I hadn't done my nails recently because they were a mess by the time I was finished.  I wasn't scrubbing so much as I was using my nails over the washcloth to scrape off the gunk.  Eventually I got the glass cleaned and I felt quite accomplished.

The racks didn't have much to clean off of them other than a few spots.  I used the Mr. Clean Magic Eraser and some vinegar to clean off those spots.   


While my oven doesn't look brand new, it is certainly in much better shape!  Good luck if you plan to tackle your own oven...and wait to get a manicure until after you are finished.

Tuesday, October 4, 2016

Up Go the Walls

Adam took full advantage of the beautiful weather this past weekend and made some serious progress on the shed.  He put up the framing for the walls.  And he somehow managed to do it all by himself.  I went to the grocery store and when I came back, he had already put up two walls!  


I couldn't believe how quickly Adam was able to put up the walls.  I envisioned this project taking a good year, but Adam seems to be working at warp speed.  It's so much fun to watch all the progress and I'm pretty darn impressed with Adam's shed-building skills.  

Jazzy and I helped out by laying in the hammock and cheering Adam on.  


By the end of the day, Adam had erected all the walls!  It's starting to look like a real shed now!  The next step is to add the framing for the roof.  


Check out the first shed post here and the second post here.  

Sunday, October 2, 2016

C'mon Letrozole!

Call us crazy.  Adam and I have decided to try yet another IUI before taking the plunge and doing IVF.  Our thinking is that if we do have to move on to IVF, we can rest assured that we exhausted all our other options.  This will be our 6th IUI.  While we're not new to the IUI process, I am taking some different medication this time around.  

I've taken Clomid in conjunction with our previous IUIs.  It's a pretty common fertility drug that stimulates your ovaries to produce multiple eggs, which increases your chances of getting pregnant.  While many women have success with this drug, it hasn't helped me out.  Among many of the godawful side effects, vision changes can occur.  The last time I took Clomid, I ended up with some temporary vision changes. There was a blurry spot in my left eye.  It wasn't very noticable, and thankfully my vision has since gone back to normal, but my doctor didn't want to take any more chances this time around.  

So I took letrozole this time around.  After reading the pamphlet that came with the perscription and finding that it's most commonly used as a breast cancer treatment drug, I got a bit worried about what I was taking.  I decided not to think too much about it and just listen to my doctor.  I took it for five days and was pleased to find that I didn't experience the extreme side effects I experienced when taking Clomid.  I had some hot flashes and my stomach felt fuller (especially when Jazzy walks across my stomach).  But no crazy mood swings.  Thank goodness!  

The next step in the process is to go in for an ultrasound to check the growth of my follicles.  This will happen next week and I am hoping to have a good number of follicles of the right size.

I'm feeling really positive this time around.  We switched infertility clinics and have a much better feeling about the doctors and nurses at this clinic.  We are also using different medication, which we're hoping will yield different results.  

While I adore my sweet little family, I'd be thrilled with the opportunity to add a baby to it.  Until then, I'll just enjoy the time I get to spend with Adam and Jazzy.  


Feel free to send any positive thoughts, prayers or good vibes our way!