Sunday, September 25, 2016

Retail Therapy

What's a girl to do when she finds out she's not pregnant for the billionth month in a row?  A little retail therapy, that's what!  And that's exactly what I spent my Saturday doing.  I happened to get a $65 rebate from purchasing my contacts in the mail recently and I decided to drown my sorrows in a little retail therapy.

I hit up TJ Maxx and Target, two of my favorite stores.  The main item I was searching for was a new tray for the ottoman in my living room.  The painted white tray that was living on our ottoman had done a fine job, but it was starting to look not so pretty.  The white paint was starting to loose its luster and I was ready for something new. 

I ended up finding this beauty at Target in the kitchen section.  It's a pretty good size and has a darker wood finish.  While I doubt it's completely waterproof, it does seem to have a finish on it that is more durable than my last tray.  The round shape mimics the round ottoman and is a nice contrast to the light fabric.   


I also found the perfect new remote holder at TJ Maxx.  I'm not entirely sure of it's original purpose. Maybe a candle holder?  But it makes the perfect remote caddy.  It's got a brass finish, which ties in with the new knobs on the tv stand and the brass giraffe nearby. 

Jazzy is equally enamored of our new tray setup on the ottoman.  She likes to gaze adoringly at it, just like her mom does.  


The other treasure I found while shopping was a 3-piece duvet set on clearance for only 20 bucks!  I have been searching for some new pillow shams recently, but was appalled at how much they cost!  We're talking 20 bucks for ONE sham!  Why the heck do they cost so much?  So imagine my delight when I found 2 shams, plus a duvet cover for $20!  I snatched that sucker off the shelf before anyone else could grab it. I even found a price scanner and scanned it myself to make sure this deal was for real.  It was!  

The color ties in perfectly with our quilt.  I added our old comforter inside the duvet cover and put it at the end of the bed.  It will be a nice addition when the weather turns cooler.     


While I'm still bummed about not being pregnant, a few nice things for our home does bring me some happiness.  

Friday, September 23, 2016

Jazzy Loves Her Walks

If Jazzy were to list the things she loves most, her list would look something like this: 

1. Rabbit Treats
2. My Mom and Dad
3. Going for a Walk

I'm okay with coming after her rabbit treats.  They bring her joy that I can't seem to compete with.  I am, however, happy that I can provide her with one of her other joys: taking her for walks.  

Jazzy adores her walks!  She has Adam and I trained to give her three walks a day, despite the fact that we have a fenced in backyard.  I wake up every morning at 5:00am so I can take her before I get ready for work and then I take her on another walk when I get home from work.  Adam runs with her at night before we go to bed.  We all definitely get our exercise in each day!  


Jazzy sure knows her routine.  In fact, she'll remind us when it's time to go for a walk by glancing ever so subtly at her leash that we keep on a hook.  Or she'll lay on the rug by the front door and look pathetically unhappy until we ask her if she wants to go for a walk.  

We have to be very careful not to say the word "walk" unless we actually plan to take her for one.  Jazzy knows what "walk" means and goes crazy when she hears it, as evidenced in the video below:


When she hears the magic word, she'll run to the door and wait patiently for us to put on her harness, collar and leash.  We taught her to wait until she hears "free" before she's allowed to go out the door, even if the door is already open.  We make her do this because she was a bit of a bolter when we first got her. She would run out the door and tear down the street.  After running after her a few times, we decided we wanted to nip that habit in the bud!  While she doesn't run away from home anymore, she still waits for the word "free" before she heads out the door.  She's such a good girl!  


Jazzy does very well on her walks, for the most part.  She does like to smell all the smells, which can get a bit tedious.  And she will eat any sort of morsel that's around...hunks of bread, cicadas, Taco Bell wrappers.  But mostly, she's very well behaved.  She even knows to stop before crossing the street. Sometimes we have to remind her to stop, but she stops on her own pretty frequently and waits for the word "free" before she crosses the street.  Maybe I'm giving her more credit than she deserves, but I feel like she knows when a car is going by and won't cross until the coast is clear.  Our thinking in teaching her this is so she'll stop and look for cars on her own in case she ever gets out.  I don't think she'd go very far if she did get out.  She's got a pretty good life.  


To end her walks, we let her off her leash once we get close to our house and tell her to "go home."  At this point, she'll make a mad dash for her house.  She likes to dive into the bushes in front of our house and make sure no rabbits dare to hang out there.  


I guess the fact that she gets to go on three walks a day explains why she's so exhausted at the end of the day.  


Wednesday, September 21, 2016

Shed Progress Continues

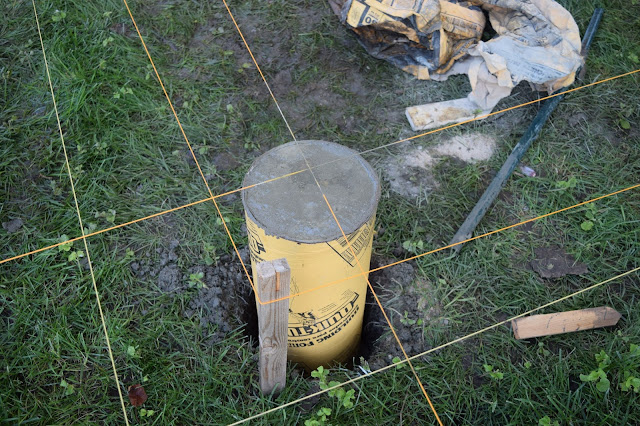
Adam is making progress on our shed!  Last we chatted about the shed, I shared how a concrete mixer was sitting in our backyard.  Adam put that mixer to good use!  After digging holes, adding gravel and placing a sonotube in each hole, adding concrete was the next step.  The concrete mixer made things easier and go a bit quicker.  


Once the concrete was added, the piers had to cure for a few days before he could move onto the next step.  


A little four-legged somebody thought it would be cute to write her name in the concrete before it dried. She must have done that while I wasn't watching!  


Once the concrete fully cured, Adam removed the cardboard from the sonotube that was visible above ground.  From there he added concrete anchors to the top of each pier.  These will keep the wooden frame of the bottom of the shed in place.  You can see a glimpse of the anchors in the photo above. Adam placed wood beams into the anchors, shimmed everything up so it was level and then attached the frame together.  I make it sound far simpler and quicker that it actually was.  Adam worked very diligently to make the base of the shed perfect!  

After the base frame of the shed was built, Adam wanted to take care of what will be underneath the shed before moving on.  So he added some landscape timbers around the perimeter of the shed.  He dug out a space for each timber to help stabilize it.  Then he added a weed mat on the inside to help prevent the grass and weeds from growing underneath the shed.  

The next step was to add gravel over the top of the weed mat.  Adam ordered it from a local landscape supply company and had it delivered to our house.  Jazzy had a fun time inspecting the large pile of gravel that got dumped into our driveway before Adam moved it to the backyard.    


From there, Adam moved the gravel by wheelbarrow to the backyard.  The gravel was placed over the weed mat and spread out.  

Now that what will be underneath the shed was taken care of, Adam added the sheets of plywood that will be the shed floor on top of the frame.


I must say, it makes a pretty good dance floor!  I tried to talk Adam into keeping it a dance floor, but I don't think I convinced him.  I'll have to get all my dancing out before he starts building the walls of the shed.  

Once the project is all said and done, we'll add some lattice between the shed floor and the landscape timbers to keep Jazzy and other critters from getting underneath the shed.  Jazzy has done a nice job of keeping any rabbits from hanging out under there for now.  


I'll keep you all posted as the progress continues!  

To find out how our shed project got started, click here.  

Sunday, September 18, 2016

Scrapbook Paper = Easy Fall Decor

Fall is coming!  That means it's time to add a few touches of fall to my home decor.  While there are a ton of cute decoration options floating around all the stores these days, I didn't want to spend a fortune.  So I opted to spend $6 on some scrapbook paper to create some of my own decor.  


The first thing I wanted to make was a banner for my mantel.  I've seen lots of cute leaf banners and thought I could create one myself.  All I needed was some twine and some leaves cut out of scrapbook paper.  I already had some leftover jute twine that I could use as the base of my banner.  And I found a darling little booklet of double-sided autumn-themed scrapbook paper at JoAnn, which also happened to be on sale for 40% off.  

Once I had my materials, I searched online for some leaf templates.  I printed them off and then used the front and back covers of the booklet to make some sturdy templates.  


Once I had all my leaves cut out, I used a small hole punch to punch a hole in each leaf.  I used a smaller hole punch so the leaves wouldn't move around on the jute twine too much.  From there, all I had to do was string on my leaves.  It turned out super cute!  


The other project was even simpler!  I cut 4 inch by 4 inch squares out of a few sheets of scrapbook paper. Once November rolls around, the squares will be used to write down one thing Adam and I are thankful for each day of November.  Then on Thanksgiving, we'll read through what we each wrote down.  We did this a few Thanksgivings ago and I recently found the paper where we wrote down the things we were thankful on. It was fun to look back and see what we were thinking about at the time.  It's just a nice way to celebrate the whole point of Thanksgiving.  

I put the squares along with a pen in a pumpkin dish.  Once we write on a square, we'll fold it up and put it in the glass pumpkin jar so we can't peek at each other's until Thanksgiving.  


Happy fall, y'all! 

Check out more fall decor ideas here and here.  

Monday, September 12, 2016

We Heart Cedar

Two recent additions to our house have us loving cedar even more!  Our cedar planter box began our love affair with cedar.  It's such a pretty wood.  It has a slightly rustic charm, yet can also look polished.  Three cheers for cedar!

The first addition happened to the front of our house.  Adam and I have wanted to replace the shutters on the front of our house for sometime now.  We weren't 100% sure what we wanted to replace them with, so we decided to take our time until we knew for sure.  After looking to Pinterest for some inspiration, we decided that we knew what we wanted.  We ended up with a very simple, yet polished design.  

Before we get to our beautiful new shutters, take a peak at what we had going on before.  We had some plastic or vinyl shutters that weren't anything special.  They were still in good shape, but lacked any sort of pizzazz.  


After we agreed on a plan, we picked out some cedar from Home Depot.  We dug through the boards and selected the prettiest ones.  We tried to grab pieces with some character to them.  Once we had the boards, Adam assembled them using wood glue and an obscene amount of clamps.  He always tells me you can never have too many clamps and the picture below seems to prove his point! 


Once the glue was dry (Adam waited for several days), he painted each shutter with 3 coats of General Finishes Exterior 450 Top Coat in a satin finish.  He really likes using this because it is water-based so it isn't as stinky as other stains or polyurethanes.  This serves as a way to keep the cedar from turning gray, while also protecting it from the sun and rain.  We'll likely have to add another coat every few years to keep the shutters protected.   


Once the shutters were dry, we were ready to hang them.  We took down the old shutters and were shocked at the number of hornets' nests hiding underneath them.  Luckily they all seemed to be vacant!  


To make hanging the new shutters easier, we decided to use the anchors that were already in the brick.  It turned out to be a bit tricky and time-consuming.  We had to figure out where the anchors would be on the shutters, drill holes in the shutters and then attach them to the brick with exterior screws.  We were both sure glad that we only had four shutters to hang as opposed to more!  

But we were so thrilled with how they turned out!  They really help dress up the front of our house!  The cedar ties in nicely with the brick and our cute, blue door.    


I feel like they make the front of our home more welcoming, as well. 


Now that we have an updated front door and gorgeous shutters, we'd like the tackle the white railings. The white seems very heavy and blocks the front of the house.  We would love to replace them with cedar posts and slimmer wrought iron spindles.  That project probably won't be started until next spring, but we are definitely sold on using cedar for the posts!  


Here's one more shot of those cedar beauties!  


The second addition of cedar to our house happened in our backyard.  After a windy storm blew down the neighbors' old rickety fence, we finally decided to replace it.  Technically it wasn't our fence, but we felt like we needed it to help finish off our yard and keep Jazzy closer to home.  Here's how things were looking before.  We had a view of our neighbors' yard.  


While we adore our neighbors, we weren't super excited about the weeds and wood look that was going on.  


So we hired the same fencing company that installed our other fence to add a section to the back, dividing our yard from our neighbors' yard.  It definitely made a big difference!  
  

It creates a nice backdrop for our yard and also mimics the cedar from the planter box.


Who knew cedar could bring us so much joy?!  

Saturday, September 3, 2016

Saying Goodbye

My grandpa Jack passed away last Friday.  While I'm grateful he's no longer in pain or suffering, it's still hard to say goodbye.  


He was my Papa and I have so many wonderful memories of him.  I can still hear the sweet enthusiasm in his voice every time he saw me.  "Well, hello, Sara!"  I can still see the way his eyes crinkled until they were almost closed when he laughed from a lifetime of telling stories of all his adventures.  I rarely heard the same story twice.  The last time we spoke I heard a story I'd never heard before about how he spent a bag of wheat pennies he was supposed to save when he was a kid.

He taught me a lot.  

He taught me to gather as many life experiences as possible.  I hope when I'm an old lady I'll have endless stories to tell my grandkids like he did.  


He taught me to laugh often.  When I think about Papa, I see him smiling and laughing.  Which is kinda ironic since he absolutely hated smiling for photos.  


He taught me to break the rules sometimes.  When my brother Cody and I were kids, he would let us stand up in the back of his van while he drove around the block.  Granted that's not the safest, it sure stuck with us as fun.  He let us drive around the neighborhood in his golf cart.  We thought we were pretty cool driving on the streets in a golf cart.


I am so lucky I got to have Papa in my life for as long as I did.