Thursday, March 31, 2016

Pinterest Project: DIY Keychains

I don't know about you, but I spend large amounts of time pinning projects on Pinterest.  And that's where it stops.  I have an endless collection of projects and don't ever try them out.  So, I thought I would start trying out a project I found on Pinterest at least once a month and share the results on this blog.  Here's my first Pinterest Project!

I spent last night making keychains and I'm not afraid to admit I had a blast.  Who doesn't love doing crafts?  It also helped me solve an organizational problem.  You see, I had this bin of keys in my junk drawer.  The keys were just randomly thrown in there and I still have no idea what two of the keys even go to.  

While perusing Pinterest, I came across this tutorial for making keychains out of clay.  The keychains looked super simple to make and they also looked super cute!  I followed the tutorial pretty closely, but did make a few tweaks.   

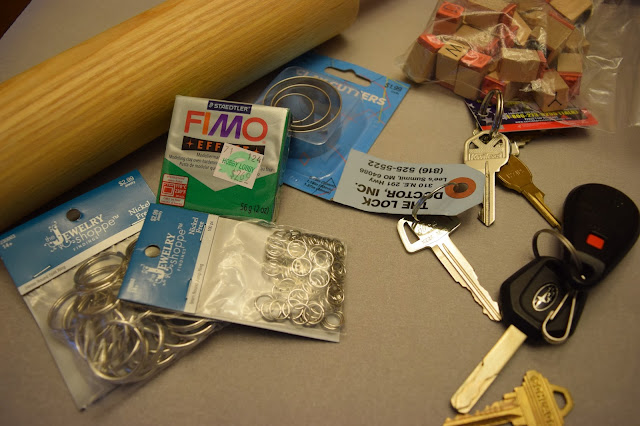
So, I headed to Hobby Lobby to purchase the supplies I needed and gathered up the rest at home.  Here's what you need to replicate this project: 


-Fimo polymer clay
-Keyrings
-Jump rings
-Clay cutters (optional)
-Parchment paper
-Toothpick
-Baking sheet
-Rolling pin

I had never worked with polymer clay before and it was a bit more difficult than I thought it would be.  It was kinda crumbly and hard.  I'm not sure if I got a bad batch or if that's just how it is.  I had to really work it in my hands to make it pliable enough to roll out.
  
Once I got it rolled into a ball, I put the ball on parchment paper and used a rolling pin to flatten it out. But it started to stick to the rolling pin.  (It's a good thing I've only used our rolling pin for projects, like helping the beadboard adhere to the wall in our half bathroom redo, instead of for cooking.  Because it now has sparkly green clay on it.)  So, I made a tutorial tweak.  I put the ball of clay in between the parchment paper so it wouldn't continue to stick to the rolling pin.


Then I proceeded to continue rolling out the clay.  Let me tell you, it wasn't easy.  It wasn't so much rolling as putting all my weight on top of the rolling pin, on top of the ball of clay and pressing down really, really hard.  It wasn't exactly the quick process the tutorial promised.  

Once I finally got a section rolled out, I used the clay cutter to cut out a circle shape.  You don't have to buy the clay cutters.  You could use a butter knife to hand-cut the shapes.  Or find something around the house you could turn into a cutter, like a small lid or cap.

Once I had my shapes cut out, I used some rubber stamps I already had on hand to put letters on the shapes.  I went with a "K" for our extra house key since our last name starts with "K."  I made an "A" and an "S" for our (Adam & Sara) extra car keys.  We have a set of keys to Adam's dad's house, so I made a bigger shape and stamped "DAD" on it.   


Then you'll want to use a toothpick to put a hole near the top to allow for the jump rings, which hook onto the key ring.  Just stick the toothpick in and wiggle it around a little until your hole is big enough.  

After that, put the clay on top of parchment paper onto a baking sheet.  Then bake the clay according to the directions on the package.  The clay I used specified a baking time of 30 minutes at 230 degrees.  


Once 30 minutes had passed, I took them out of the oven.  They still seemed a bit soft in the center, so I put them back in for 10 more minutes.  After 10 minutes, I checked them again and they still seemed like you could easily bend them.  So, I consulted Google and it told me that the clay will fully harden after it's been completely cooled.  So, I decided to let them sit overnight before moving onto the final step.  
   

On a side note, I had no idea my oven was so dirty!  I will have to find a cleaning solution on Pinterest...

Anyways, the next day, the clay had hardened up nicely.  The final step was to use the pliers to open up the jump rings, slip them into the holes on the keychains, add the key ring and them close them up. 

Finally, you can add your keys.  They turned out pretty cute and helped me organize all those extra keys I had lying around.  But seriously, who can't use a glittery green keychain?


All in all, I'd say this was a successful Pinterest Project!  Here's my review of the Pinterest Project:

-Tutorial: B
The tutorial was very easy to follow and the pictures definitely helped illustrate the steps.  It was a bit deceiving on just how much time it really takes, but was still a relatively short amount of time.    

-Level of Difficulty: A-
Even though it took longer than I thought it would, it wasn't anything too difficult.  The hardest part was working with the clay.  And that just might have been because I'm a newbie at it.  

-Finished Project: A+
I love how the keychains turned out!  They seem like they will hold up well and are adorable.  
Monday, March 28, 2016

What We Learned About Installing Beadboard

Adam and I recently completed our half bathroom remodel!  We added beadboard to the walls and it looks pretty darn fancy.  Any time you add a little beadboard to a space, it ups the wow-factor rather quickly. 


It wasn't an overly complicated project, but it did take some time.  We managed to figure out some tips and tricks that helped make things easier.  We also made some mistakes.  So I thought I would share it all with you today, in case you ever plan to tackle a beadboard project of your own.  

Tips & Tricks

  • One of the first steps you'll need to take when installing beadboard is to figure out where the studs are in your walls.  You'll want to attach the beadboard to the studs in the wall to make sure it is nice and secured.  We used a stud finder to help us, but wanted to make sure the stud finder was accurate.  So, we used some straight pins to double check that there were actually studs were the stud finder said there should be studs.  Just stick the pins into the drywall where you think there might be a stud.  If there is a stud in that location, the pin will stop when you hit the stud and it won't go in all the way.  If you don't hit a stud, the pin will go all the way in. And if you test this out in the space that you will be adding the beadboard, you don't even have to worry about fixing the pin holes because the beadboard will cover it up!


  • Chances are, there will be some spots where you will have to join two different pieces of beadboard, which will result in a seam.  We found it best to join the two pieces of beadboard on the flat part of the beadboard and not the indentation, like the first picture below shows. Even though it looks really obvious now, it's nothing a little caulk and wood filler can't fix. Adam ran some caulk down the seam first.  He ran his finger down the seam to push it into the crack and wipe off the excess.  Once that dried, we used a sander to smooth things out.  Then I went over it with a wood filler to make sure there weren't any nooks and crannies left.  Once the wood filler dried, we sanded once again.  You might have to repeat this step if it's still not smooth.  To test if it is really smooth, close your eyes and feel the spot where the seam is.  If it's smooth, you are ready to paint.  If it's not smooth, put another coat of wood filler on.  It will be more work, but you'll be happy you took the time to do it now.  The second photo shows the seam after caulking, adding wood putty and painting. 


  • Caulk is your friend!  Although it can be messy and a bit cumbersome to use, it really does help hide lots of imperfections.  Adam went through many tubes of caulk in our small half bathroom.  He ran a bead of caulk along the floor and baseboard to cover up a tiny gap.  He used it in the corners to hide the places where the two pieces of beadboad met.  He used it on top of the chair rail to make it look more finished.  He used it around the window to hide the tiny seams.  Basically, anywhere there is a little gap or ugly part, put a little caulk on it!  

Don't Make Our Mistakes

  • We knew it was important to label our studs so we would know where to attach the beadboard to the wall.  However, we didn't give much thought to where we should label the studs.  We ended up labeling the studs on the wall where the beadboard would cover it.  Whoops!  So, make sure you mark the studs above or below where you will be putting beadboard.  If you don't want to write on the wall or floor, you can always use painter's tape to mark where the studs are located.
  • When you cut beadboard, you will want to cut on the back side of it.  That will help prevent the front surface from getting torn up.  That also means you will need to reverse any measurements you have.  When we went to cut out the piece that went around our window, we forgot that the board was flipped over and that we would need to have the opening on the left side of the board, as opposed to the right side of the board.  Luckliy, we figured this out before we cut.  Good thing we followed the whole measure twice, cut once rule!  
  • We looked around Pinterest and on other blogs in preparation for this project.  Some of the blogs we looked had gave some helpful hints, while others just created more work for us.  One example was when we decided to follow the advice to put a mound the wood filler over each nail hole instead of using a putty knife to remove the excess.  This was a big mistake.  When wood filler dries, it is super hard and dense.  So, we had a ton of sanding to do.  Adam eventually got out his random orbital sander to finish the sanding job so our arms wouldn't fall off and our fingertips wouldn't be rubbed off by the sanding blocks we were using.  So, take our advice instead:  Don't mound the wood filler!  Use a putty knife to wipe off the excess before it dries.
  • One other mistake we made was to measure up from the floor.  Floors are notorious for being wonky and un-level.  We knew this, but just didn't really think things through.  Since we measured our beadboard from the floor up, the top of our beadboard was all different heights because our floor was not level.  This resulted in more cutting to even things out.  If we could go back in time, we would have snapped a chalk line on the wall and measured down from that.  That way, the top would be nice and even the first time around.  It's not as big a deal for the bottom to be uneven because the baseboard will cover up those size discrepancies.  The chair rail we chose had a lip on it, so it needed to sit on top of the beadboard.  If the beadboard was un-level, then our chair rail would have been un-level, too.  So, save yourself some time and a headache and just start with a chalk line and measure down from that.  


There you have it!  All we know about installing beadboard in one handy post.  Good luck if you decide to tackle a beadboard project of your own!  


Saturday, March 26, 2016

Jazzy Gets Pampered

With the warmer weather starting to stick around, I noticed Jazzy would start panting on our walks.  Her winter coat was starting to be a bit too warm for her.  I also hadn't realized how crazy Jazzy's coat had gotten until I was working on the latest Jazzy post.  She was starting to look a little scraggly and wild.  I think that must be why she looked so crabby when I took this photo of her.    


So I set up an appointment at the doggy spa for Jazzy get some much needed pampering.  This was the second time Jazzy has been and it was much less tramatic for me this time around.  I was very nervous about leaving Jazzy in the care of someone else the first time she got a haircut.  But the place we took her to did a great job and treated her quite well, so I was much more relaxed about taking her to the same place the second time around.

Although I must say, it was still pretty rough when I looked back over my shoulder as I was leaving and looked at Jazzy's face.  I could tell she was thinking, "Wait!  Why are you leaving me here!?!"  Okay, so it probably wasn't that dramatic, but I still worry that Jazzy will think I've left her.  

We were reunited a few hours later.  There was lots of jumping and kisses.  Jazzy did some jumping and gave a few kisses, as well.  We were both happy to see each other.

Jazzy looked absolutely adorable, as well.  The groomers put on a cute Easter bandanna.


Jazzy definitely looked less like a homeless dog and more like the spoiled-rotten sweetheart that she is. She also looks more like a lady now.  People tend to think she is a boy and I can understand why since her beard was getting so long.   


She even surprised me by not being bothered by the bandanna.  She was happy to keep it on long enough for her daddy to see how darling she looked when he got home from work. 


  Now Jazzy's heart-shaped marking is more prominent.  She's such a cutie!   


Okay, I will stop gushing about Jazzy now.  But, seriously, have you ever met a sweeter dog? :) 

Friday, March 18, 2016

Hello, New Half Bathroom!

Adam and I have finally completed our half bathroom revamp!  It turned out super cute and we managed to do it all by ourselves.  I find myself visiting the half bathroom quite often, if only to stand in there and admire our handiwork. 

Here's what we were working with:


It was just okay.  We weren't crazy about the size of the vanity and sink.  It seemed like it took up half the bathroom.  And the paint color wasn't anything special.  The bathroom served its function, but it wasn't really our style.   


Plus, there were a few outdated features.  For one, there were ugly gold and silver fixtures.  The grout on the floor made the tiles look dingy.  And then there was the toilet that didn't flush properly.  You had to hold the handle down for a good 30 seconds in order for it to work.  

So, we set out to update the space and make it more our style.  I talked about our preliminary plans here. Once we had a plan in place, we started tackling one project at a time.

By the end of our renovation, we tackled quite a few projects to turn this space from ho-hum to 
ah-mazing:
-Fixed the flapper on the toilet so you don't have to hold the handle down
-Installed beadboard on the walls
-Installed baseboard
-Installed chair rail
-Replaced the sink and vanity with a slimmer model
-Used Grout Renew to make the grout lines look like new
-Painted the walls 
-Painted the window and door trim bright white
-Replaced the old wooden blinds with a sleek new bamboo shade
-Added a new brushed nickel towel hook and toilet paper holder

After lots of hard work, cursing (from Adam) and laughing (from me), we ended up with a beautiful space that perfectly reflects our style.  


This vanity and sink from Lowe's made the final cut.  We loved the slimmer profile and curved lines.  It fits the space much better than the previous sink, while still offering some storage.  


The beadboard on the walls makes everything very crisp and clean.  While it took some trial and error and some time, Adam and I are very pleased with the results.  I am working on a post to provide some tips and tricks that helped us out, so be on the lookout.  


We decided to go with a dark blue color to contrast all the white in the small space.  We used the same color that we used in our bedroom and master bathroom.  It is called Smokey Blue by Behr.  It's very dark and moody with a hint of gray, but plays quite nicely with white.  

To pick up more of the gray hints, we added a driftwood gray mirror and bamboo shade.  I used this handy tutorial to help hang and shorten the bamboo shade. 


I decided brushed nickel would be the perfect finish to compliment the color scheme.  So, we bought this faucet at Lowe's and also found a towel hook (it was in the section with the cabinet pulls).  At Home Depot, I bought this towel ring thinking it was a toilet paper holder.  It works quite well as a toilet paper holder even if that wasn't its original purpose.  If the shoe fits...:).  And to finish things off, I found a simple trash bin at Home Goods.  I like how all the fixtures have a boxy look, which helps tie them all together.    


Adam and I are pretty darn pleased with how our little half bathroom turned out!  And we can say we did it all by ourselves.  Yay for diy projects!    

Thursday, March 17, 2016

Jazzy Travels in Style and Safety

UPDATE: We exchanged Jazzy's Sleepypod Clickit Utility Dog Harness for the Sleepypod Sport Dog Harness.  Read this post for more details.  

Adam and I try to be good parents to Jazzy and look out for her general well-being.  When we first got Jazzy, we bought her a harness that attached to the seat belt in the car.  We didn't want her to get hurt wandering around the car or if we were to get into an accident.  We figured most doggy seat belts were created equal and as long as we strapped Jazzy in, she would be safe.  

Turns out, we were wrong!  Adam's mom shared this article with me.  It points out how dog seat belt harnesses are not regulated and some can even end up causing more harm than good in an accident. Yikes!  
So, we researched some of the top safety picks in the article and decided to buy the Sleepypod Clickit Utility Dog Harness.  It was a bit on the expensive side (around $90), but if it keeps our dog baby safe, it's worth it.  

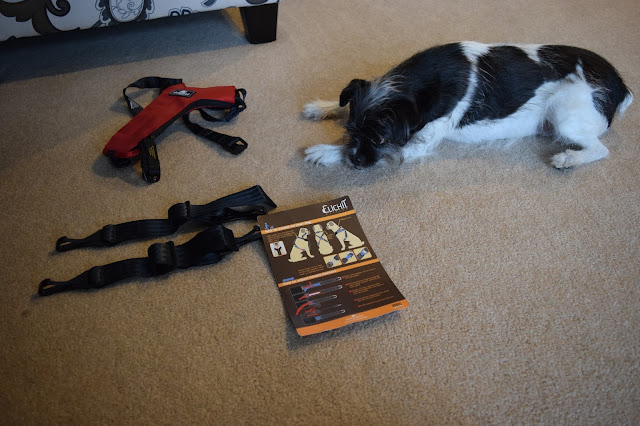
It came in the mail the other day and Jazzy was very excited to try it out.  Adam tried it out first and reported back that it worked well and Jazzy liked it.  When I decided to take Jazzy on a little ride with me, I was curious to see how well it worked for myself.  When I showed it to Jazzy, she seemed to know that it meant she got to go for a ride.  She put up with me taking a few pre-ride pictures, but wanted me to get on with it so she could get in the car! 


What makes it super safe and secure is the three-point harness.  There is the harness that goes on Jazzy. And then there are two straps that connect to the rings in the backseat that you would connect a car seat to.  It came with a handy illustrated guide to show you exactly what to do.  It took a little while to get things all adjusted at first, but I'm sure we'll get faster at putting it on the more we use it.  

After Jazzy got her harness put on, she excitedly hopped up into the backseat.  I attached the two straps to her harness and the car seat rings in the backseat.  


The final step is to slide the seat belt through the harness and click the seat belt into place.  Once everything was connected correctly, Jazzy was tied in three different places. 


Even though Jazzy is nice and secure, she can still sit and lay down comfortably.  She didn't seem to move around as much as she did with her other seat belt harness, which is a good thing.  I wasn't as concerned about having to make any sudden stops or sharp turns because I knew Jazzy was safe and sound.  


All three of us are happy with our latest purchase.  Adam and I can rest assured that Jazzy is safe.  And Jazzy feels quite stylish, as well as safe, in her new harness.  She gives it two paws up! 

Wednesday, March 16, 2016

Thinking About IVF

With yet another month of not getting pregnant, Adam and I are starting to think about other options. We've tried lots of different things, including 5 IUIs and acupuncture.  Nothing has seemed to work its magic yet.  It seems as though we will need to head towards IVF if we want to end up pregnant.  

IVF is In Vitro Fertilization.  Basically, an egg and sperm are mixed in a little dish and then when the egg is fertilized, it is put back into your uterus.  Of course, it's far more complicated, but that's the basic idea.  

It's incredibly frustrating to have to think about IVF.  Adam and I were able to get pregnant on our own with our first baby without any help.  And the doctors can't seem to find any reason why we can't get pregnant now.  I'm hesitant to move towards IVF because it seems like we should be able to get pregnant again without strong medical interventions.  

While mulling over the idea of IVF, there are many factors to consider.  One of the biggest factors for us is the cost.  Once you take the medications and procedures into account, it will cost in the $13,000 ballpark. That's a big chunk of money and not an amount we have laying around.  And that's just for one attempt. According to our doctor's success rate, women under 35 using their own eggs have a 57% chance of conception for each transfer.  While that's a lot higher than the 15% chance of conception for an IUI, that's still basically a 50/50 shot.  That's a lot of money and a lot of pressure for one try.  

Then there's the emotional side of things to consider.  I would have to take medications and give myself shots, which would affect my hormones.  I would also have to be put under sedation to have my eggs retrieved.  I'm not gonna lie...it sounds very overwhelming.  

But I keep coming back to the idea that it could work.  And we could end up with a healthy baby.  When I was doing dishes the other day, I looked up at my kitchen towel and was reminded that I shouldn't quit my daydream of becoming a mom.  


Adam and I are still trying to figure out what's best for us.  It's a big decision and not one that we take lightly.  I know we'll figure it out and hopefully, one way or another, Jazzy will get a sibling.  

Tuesday, March 8, 2016

Bang!

Jazzy never fails to impress me with her ability to learn new tricks.  She seems to be an incredibly fast learner.  Either that or she knew how to do all these tricks before we got her and they just come back to her rather quickly.  But I'm leaning towards her just being super smart.    

The latest trick Jazzy has mastered is called "Bang!"  I feel as though I must preface the explanation of this trick by saying I, by no means, support gun violence.  With that being said, allow me to explain "Bang!" You have to make your hand look like a gun by holding out your index finger and holding up your thumb. Then, you have to jab your hand at Jazzy and say, "Bang!"  Jazzy responds by laying on her back with her paws up by her face and freezes.  It's absolutely adorable.  I can hardly handle how cute she is when she does this.  

I felt that everyone should be able to see this darling trick.  So, here it is: 


Cutest trick ever, right?  

Wednesday, March 2, 2016

How To Make Tiled Floors Look Like New

Adam and I are hard at work transforming our half bathroom.  I can't wait until it's all finished and I can share the results!  In the meantime, here's an easy update that made our tiled floors look like new.  The best part...it only cost us 12 bucks!  

The floor in our half bathroom is tiled.  It's in pretty good shape and neutral enough that it didn't warrant replacing it.  The grout lines, however, were looking a bit gross.  I had tried and tried to scrub them clean, but they were hopelessly stained.   


As an avid diy blog reader, I came across this post from Young House Love and this post from The DIY Playbook that raved about Polyblend Grout Renew.  Essentially, it's a product you paint over dingy grout lines.  It comes in 38 different colors, is cheap and is super easy to apply. 


I wasn't entirely sure which shade to buy since there were so many options, so I ended up going home with two different shades.  I selected Snow White, which is a slightly off-white color, and Platinum, which is more gray.  

I decided to test out the product and different colors in my upstairs guest bathroom.  It has tile on half of the floor where the toilet is and carpet on the other half.  Not the best flooring for a bathroom.  Replacing the flooring with all tile is on our to-do list, so I figured this would be the perfect area to test things out.  


All you do is paint on the product with a tiny craft brush.  If you get any on the tiles, you have to wipe it off quickly before it dries.  It does dry rather quickly, so it worked best to work in small sections.  At first, I was trying to be super careful and not get any on the tile, but soon found that to be too tedious. So I started just swiping the grout lines with the craft brush without too much care and then wiping off the excess afterwards.  It seemed to go quicker.  

Here are the two different color options I tried out.  Snow White is on the left and Platinum is on the right.  

I decided Platinum didn't really work with the tone of the tiles, so I decided to go with Snow White.  Plus, it seemed to match the caulking around the toilet and tub better.  

Look at the difference it made!  It covered up all those stains, but still looked like grout.


I was convinced after how well it worked out in our guest bathroom that I did the same in our half bathroom.  It turned out equally well!  (Can you see the sneak peek of our beadboard walls?) 


It was well worth hanging out around the toilets on the floors in my bathrooms.  I love that it was simple and inexpensive to make my tiled floors look like new!